Test Case
The Test Case module provides a platform for efficient test case management, encompassing the creation, editing, and selection of test cases, specifically designed for API and BI testing.
Homepage
Users can create new test cases, whether they are manual or automated, with detailed steps and expected outcomes. The module facilitates easy customization with both List View and Grid View options and has actions such as Run, Edit, and Delete. Users can select, execute, and analyse the test case's execution history, gaining insights into the total number of runs, passed and failed outcomes. The fundamental aspect is the comparison between Actual and Expected data, ensuring a thorough evaluation for both API and BI scenarios.

The image represents the home page of the Test Case module, accessible via the Test Case icon in the side navigation bar. Here's a simplified guide to navigating this interface effectively:
Testcase UI

Navigation
Start by locating the Test Case icon situated on the left navigation bar. This icon acts as the entry point for accessing the Test Case module's home page.
Selecting the Test Case icon will effortlessly guide users to the designated home page interface, facilitating intuitive navigation and streamlined access to Test Case management.
Upon accessing the home page, users will encounter a comprehensive display showcasing the Test Case they've created.
Selected Projects
The chosen project name will prominently feature in the Test Case header, providing users with immediate context and clarity regarding the project associated with the current test case.
This ensures seamless navigation and helps users stay focused on managing releases within the context of the selected project.
Back to Homepage
Incorporating a back button within the test case page header facilitates seamless navigation between test case and releases.
This intuitive feature allows users to effortlessly return to the release page from the test case interface, enhancing user experience and ensuring fluidity in project management tasks.
View Test Cases
Upon entering the Test Case home page, users are greeted with a comprehensive presentation of their created test cases. Each test case is meticulously showcased, providing users with an insightful overview of their project's progression.
Test Cases are thoughtfully organized, presenting users with the flexibility to view them in either List view or Grid view. This customizable feature caters to users' preferences and workflow needs, allowing for efficient management and navigation of test cases.
The navigation tab and the Grid and List views are shown in the image below:
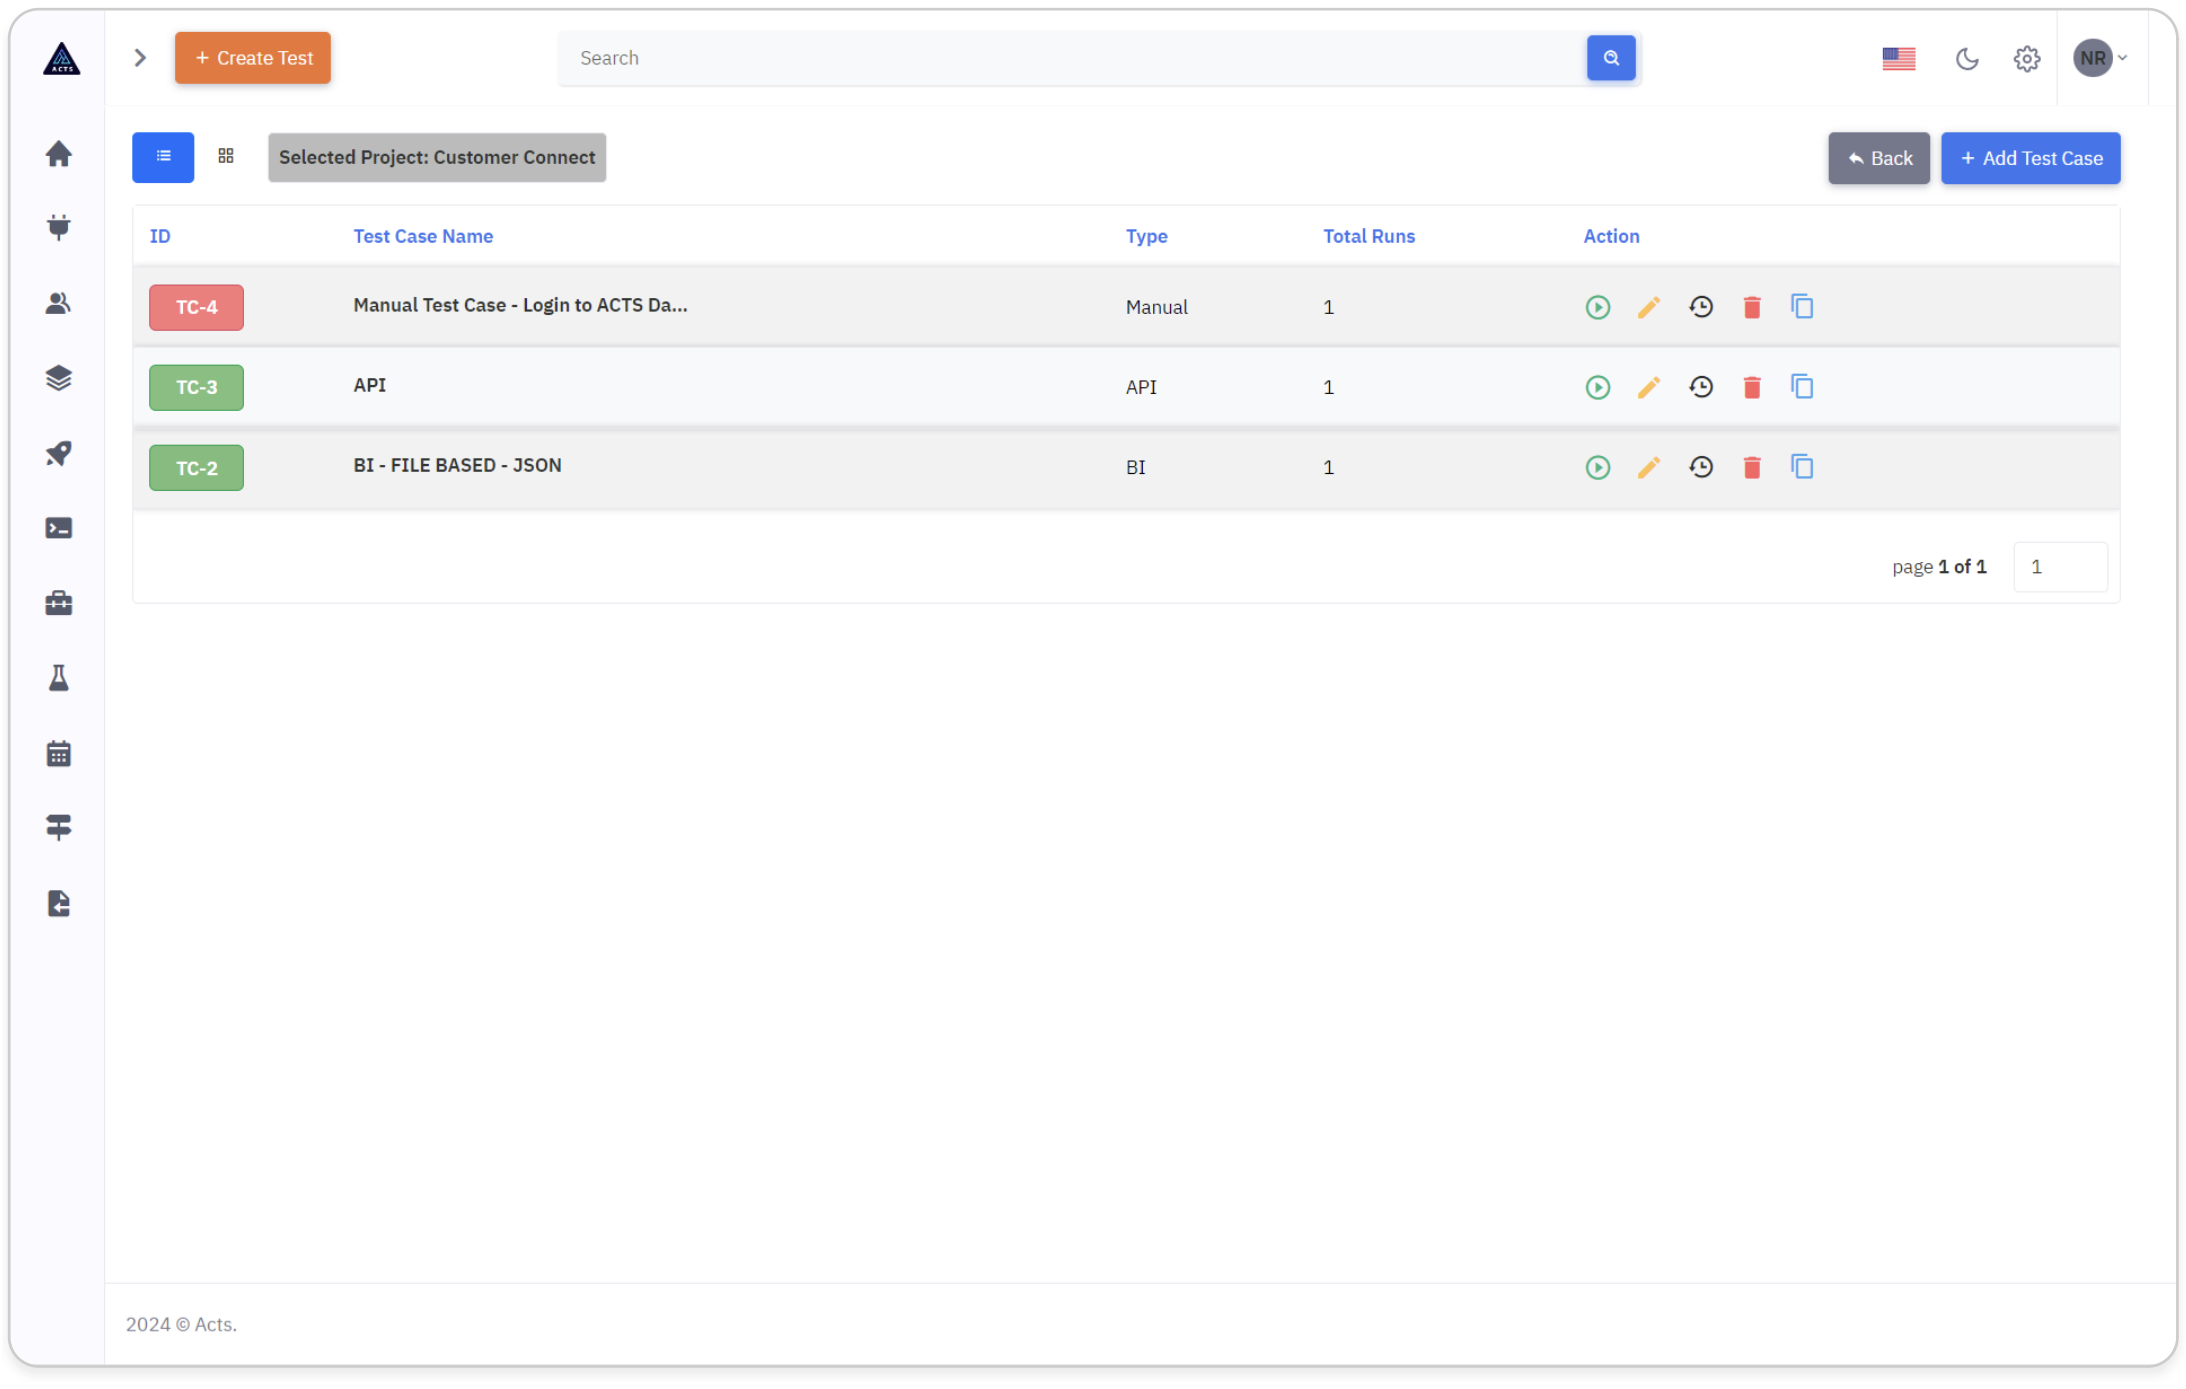
List View
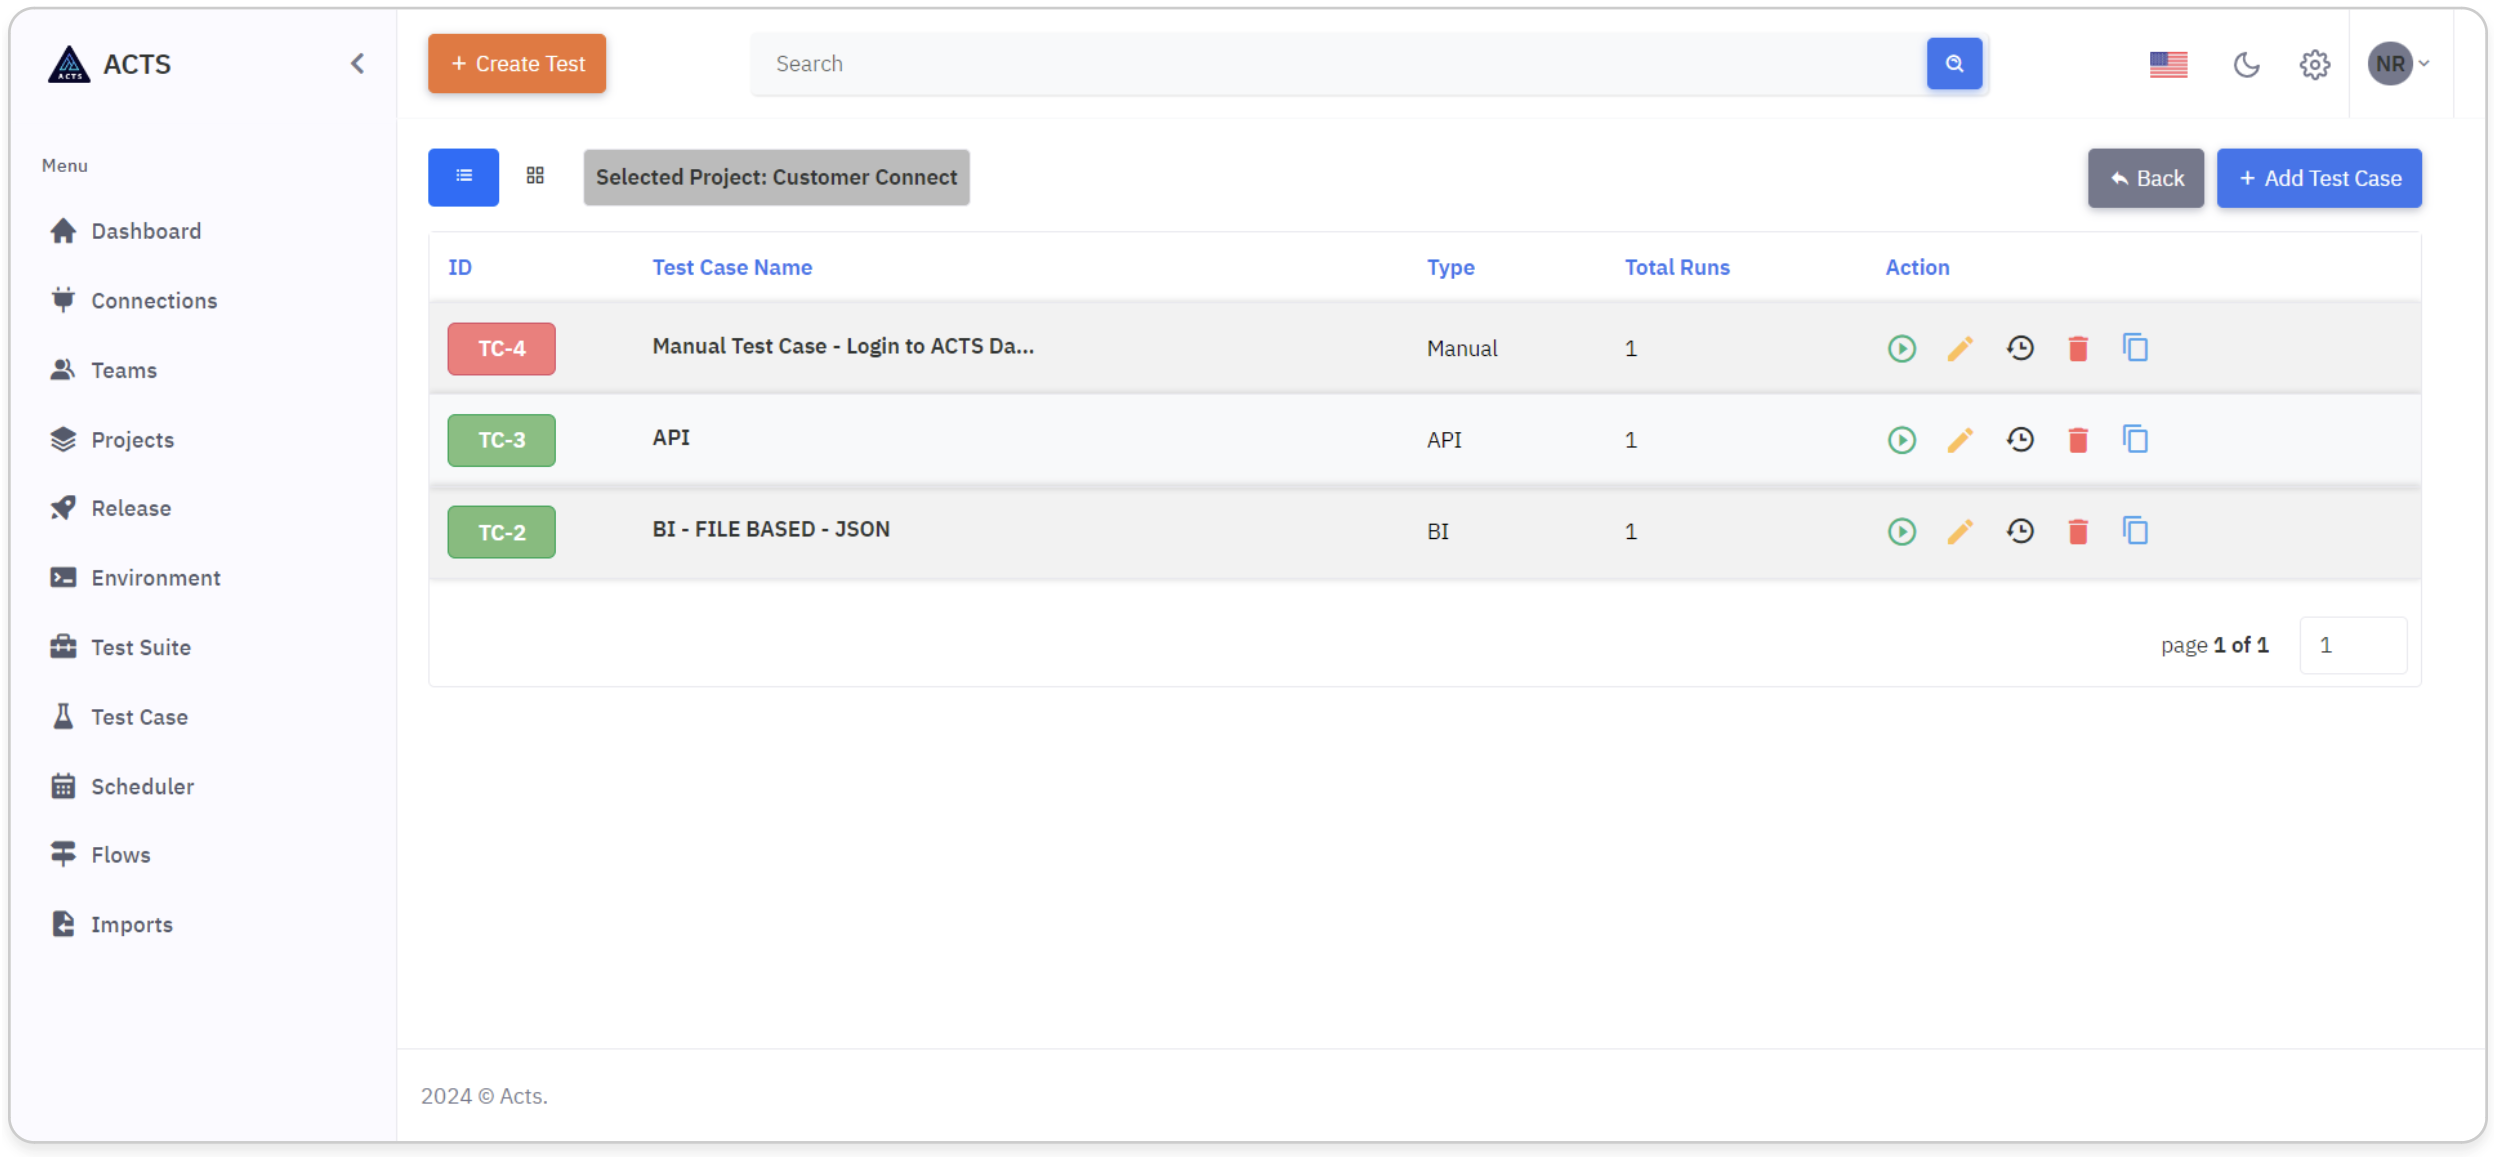
In the list view of the Test Case module, users gain visibility into their created test cases.
Each test case is represented by a unique ID and displays essential details such as the test case name, test case type and total run count.
Users are empowered to take action directly from the list view interface.
Utilizing intuitive icons, users can effortlessly perform tasks such as running, editing, viewing history, deleting, or copying test cases.
This streamlined approach simplifies release management, enhancing efficiency in integrating external systems within our application.
Grid View
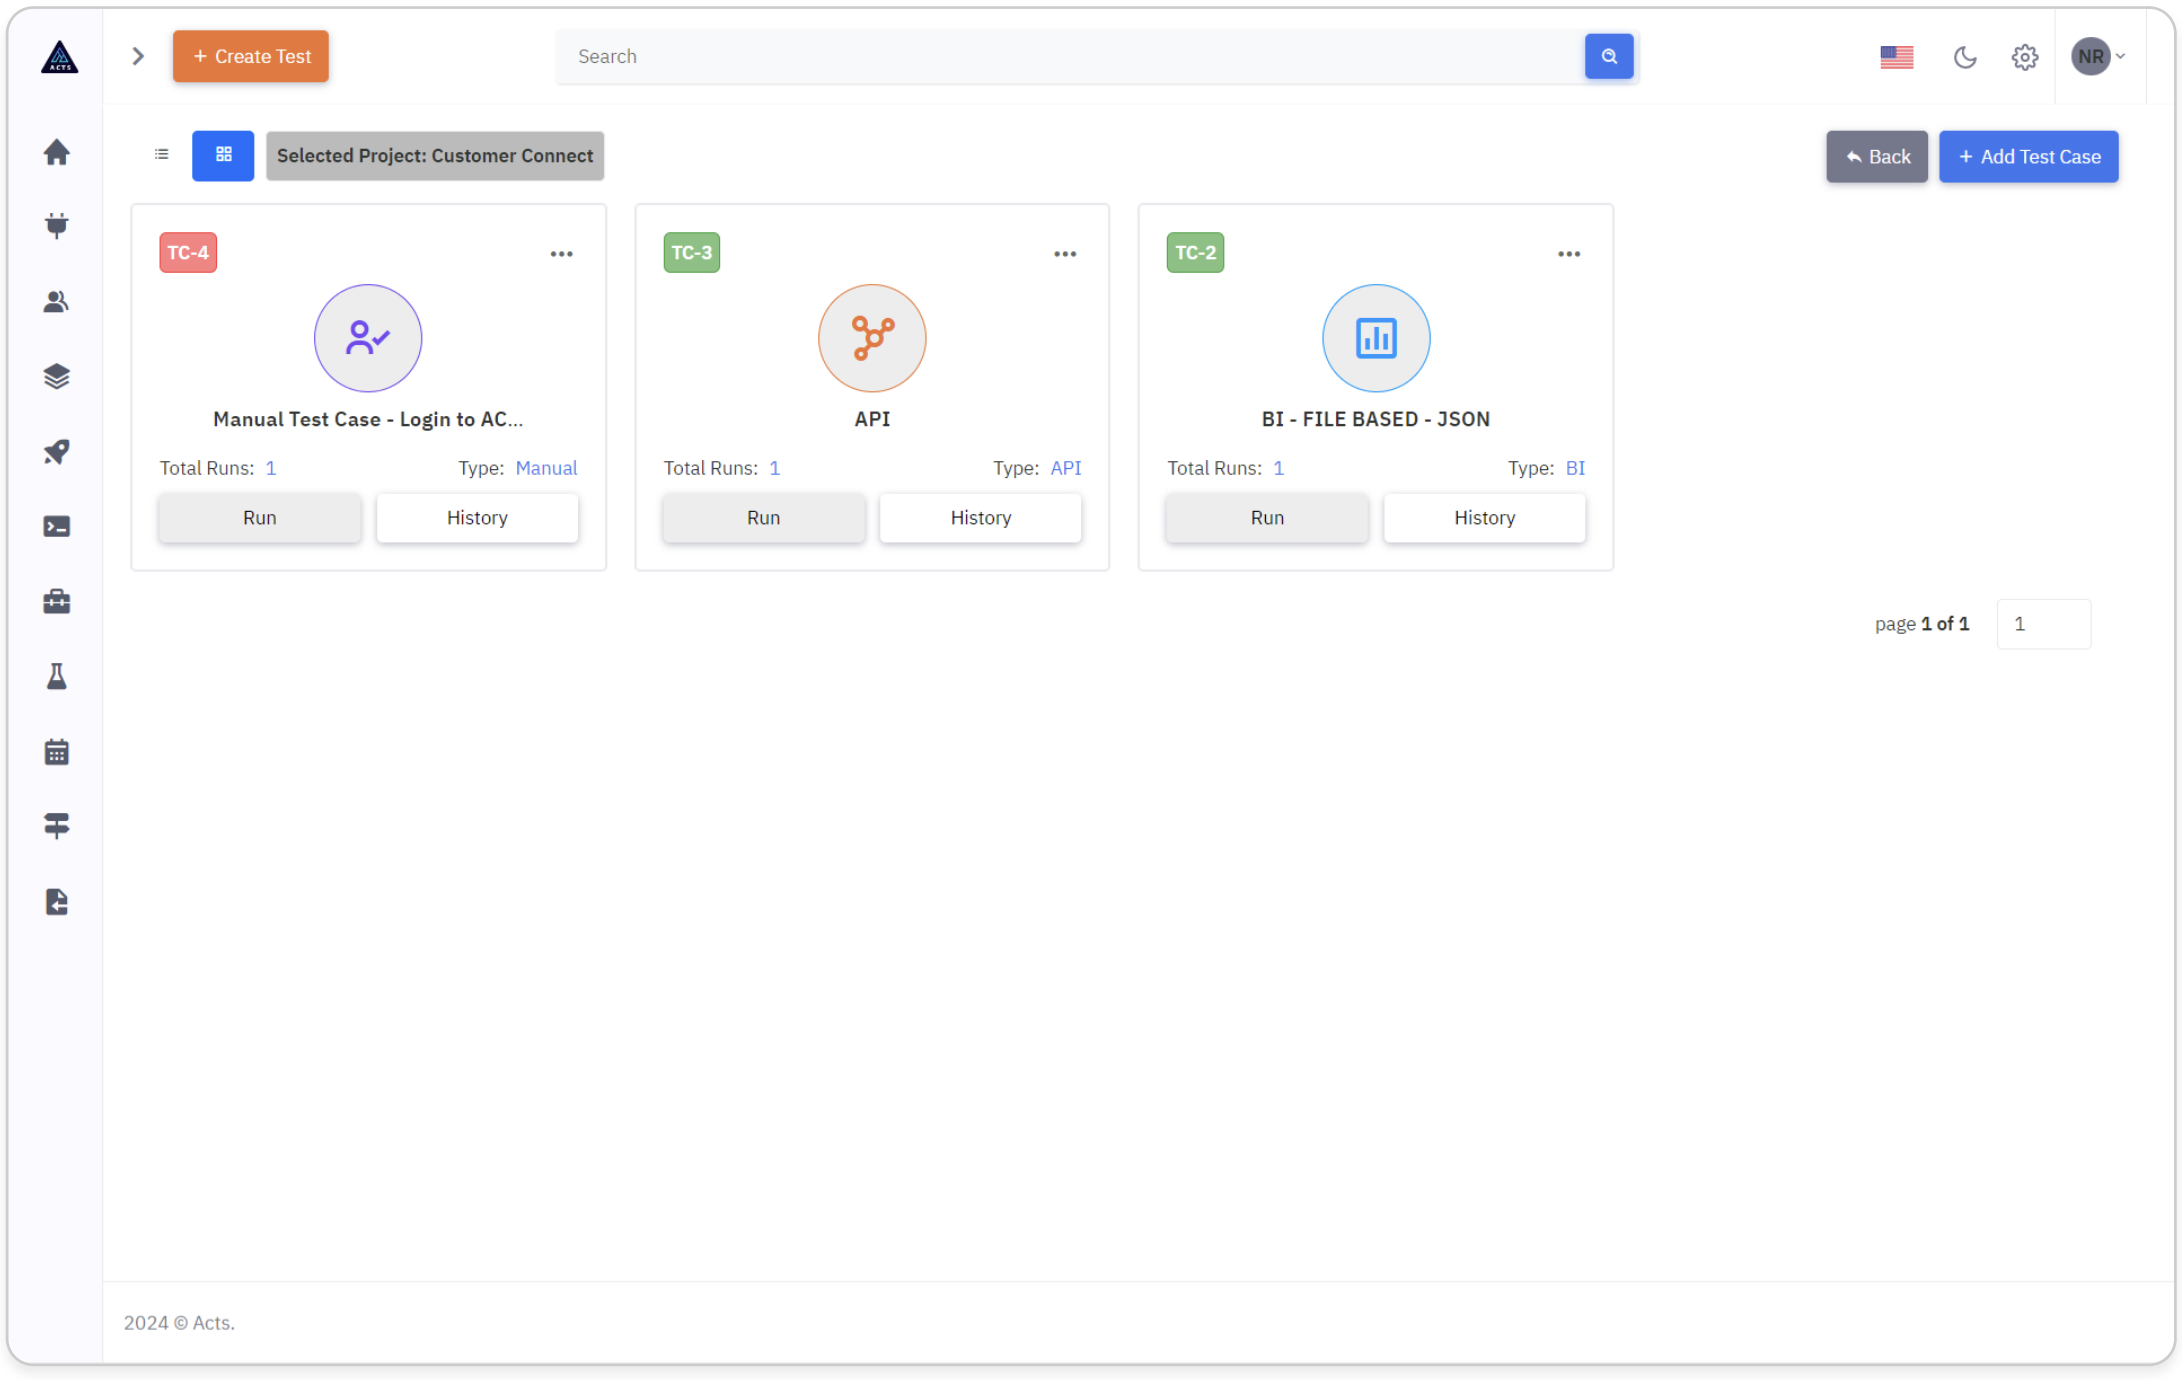
Within the grid view of the Test Case module, users can conveniently visualize their created test cases in a visually organized layout.
This structured presentation enhances user comprehension and facilitates efficient management of test cases.
Users can effortlessly manage their test case within the grid view interface.
By utilizing the ellipse icons provided, users can seamlessly execute actions such as editing, deletion, viewing history or copying of test cases.
Through related icons, the grid view interface displays the type of test case, providing users with valuable insight into the testing scope of their projects.
How to Add Test Case
To create a new test case, click on the “Add Test Case” button at the top right corner of the page.
A test case creation template appears, enabling users to create a new test case.
The template for creating a test case will encompass configurations for various types of tests, ensuring comprehensive integration capabilities.
Types of Test Cases
Manual Test Case
BI Test Case
API Test Case
The page for creating test case will provide option to create Manual test case by default. You can choose the radio button option "Automated Test" which will feature a dropdown menu listing various types of automated tests available. Users can choose from options such as UI,BI and API.
Manual Test Case
Manual test cases are executed manually by the tester, who follows the prescribed steps to validate the correctness and effectiveness of the software. They are essential for identifying bugs, issues, and discrepancies in the software before it is released to end-users.
How to create a Manual Test Case
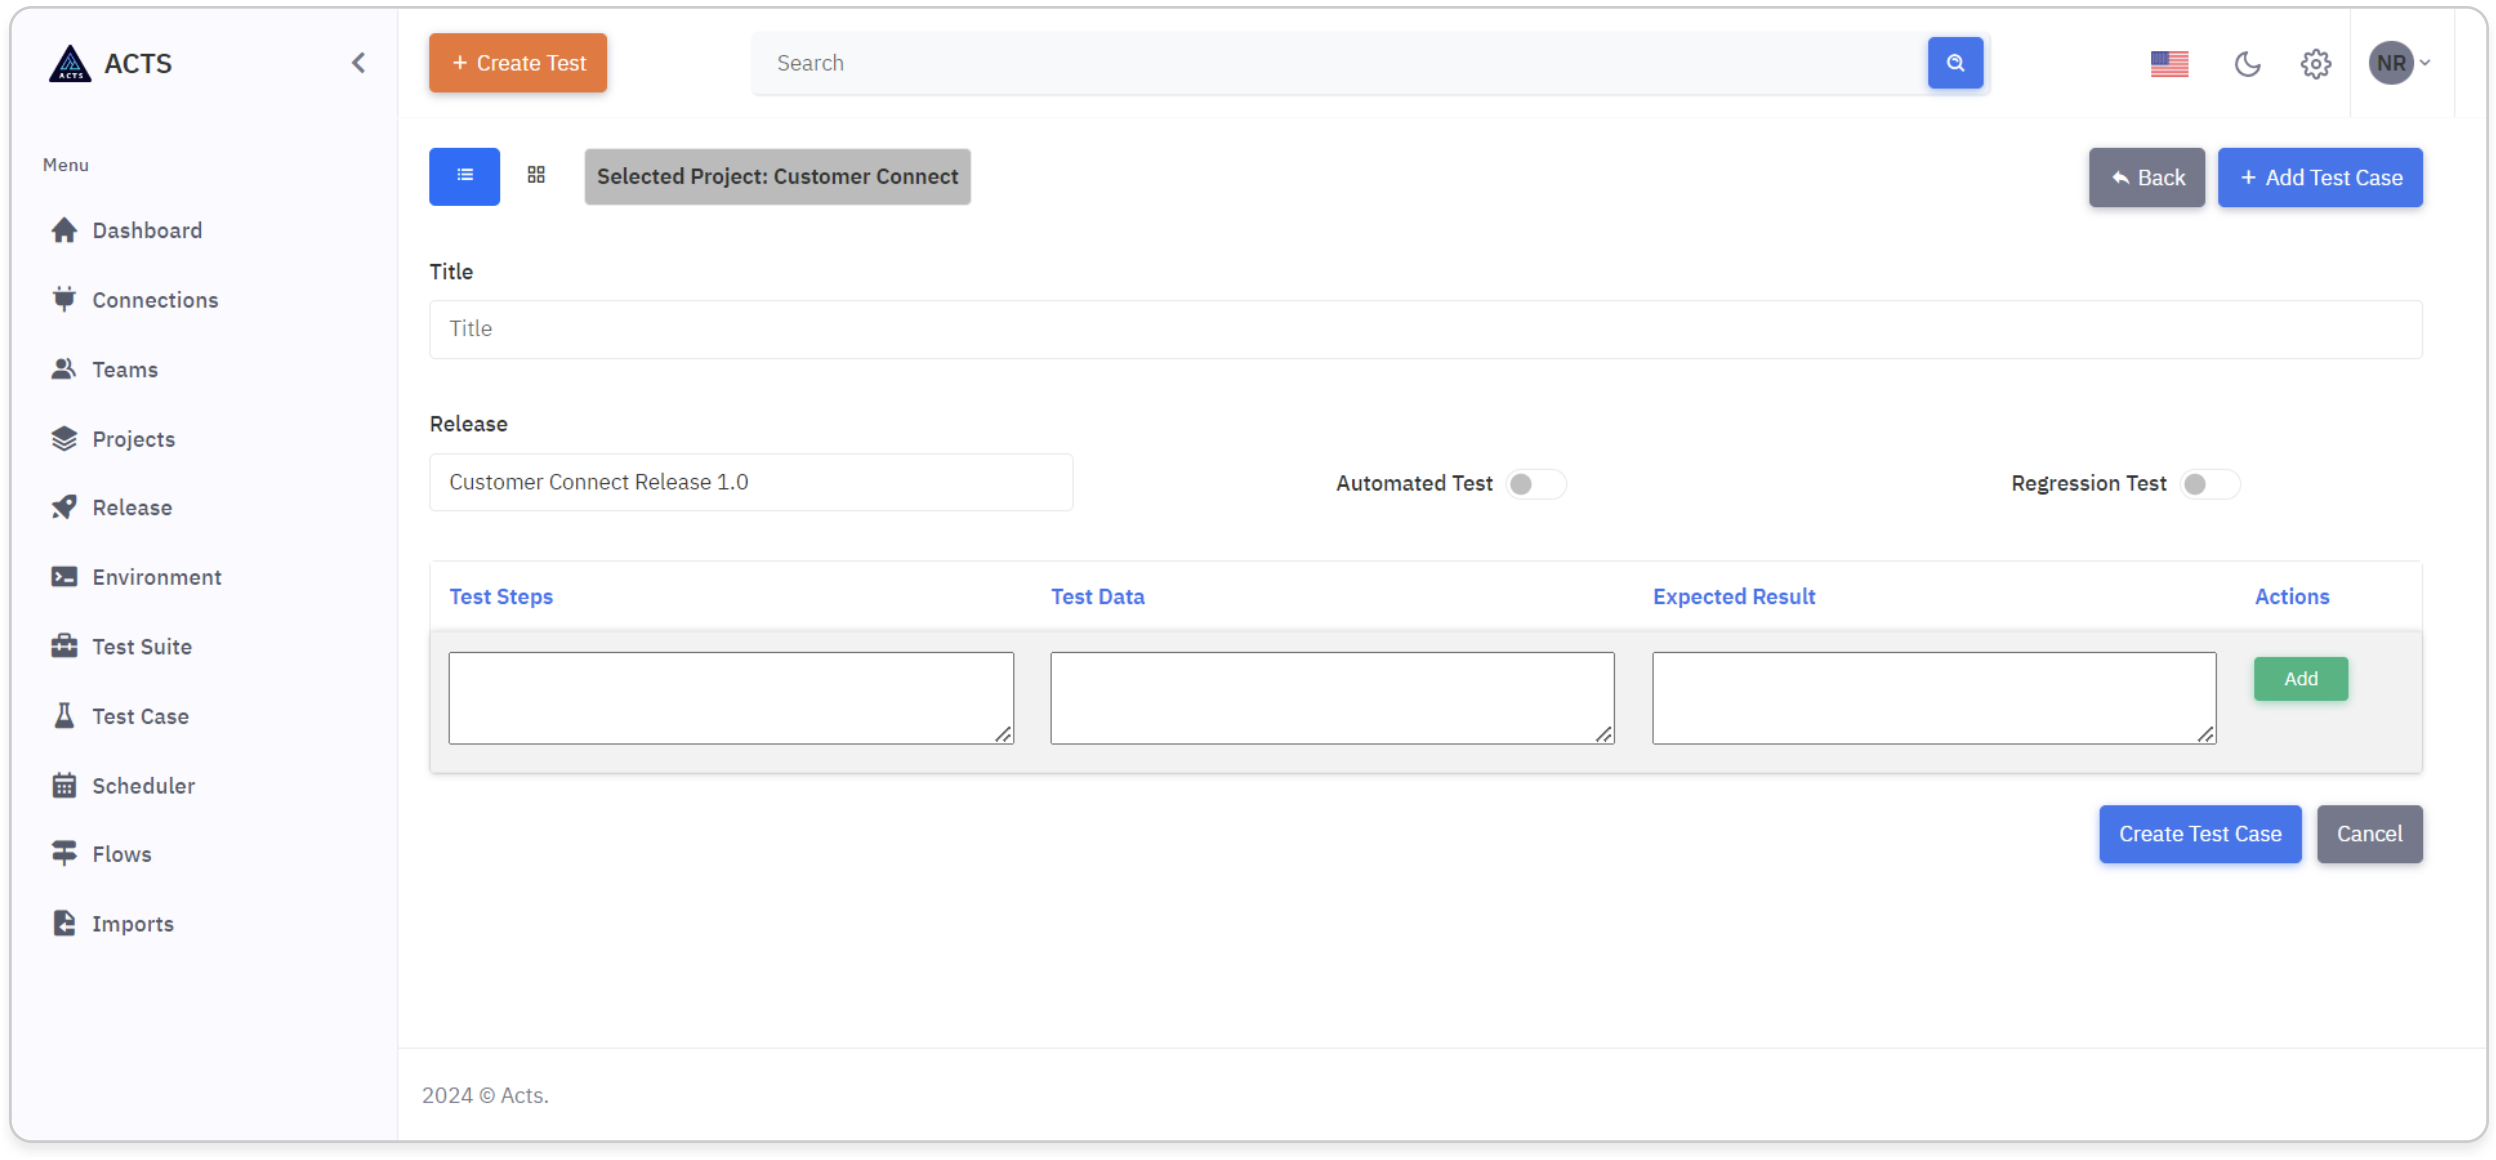
Test Case Title
Provide a title for the Test Case, facilitating easy identification and management within the application.
Test Steps
Provide the steps involved for testing a particular functionality.
Test Data
Provide the test data(if any) that is required for the tests.
Expected Result
Describe the result that is expected on following the test steps provided in the Test Steps field.
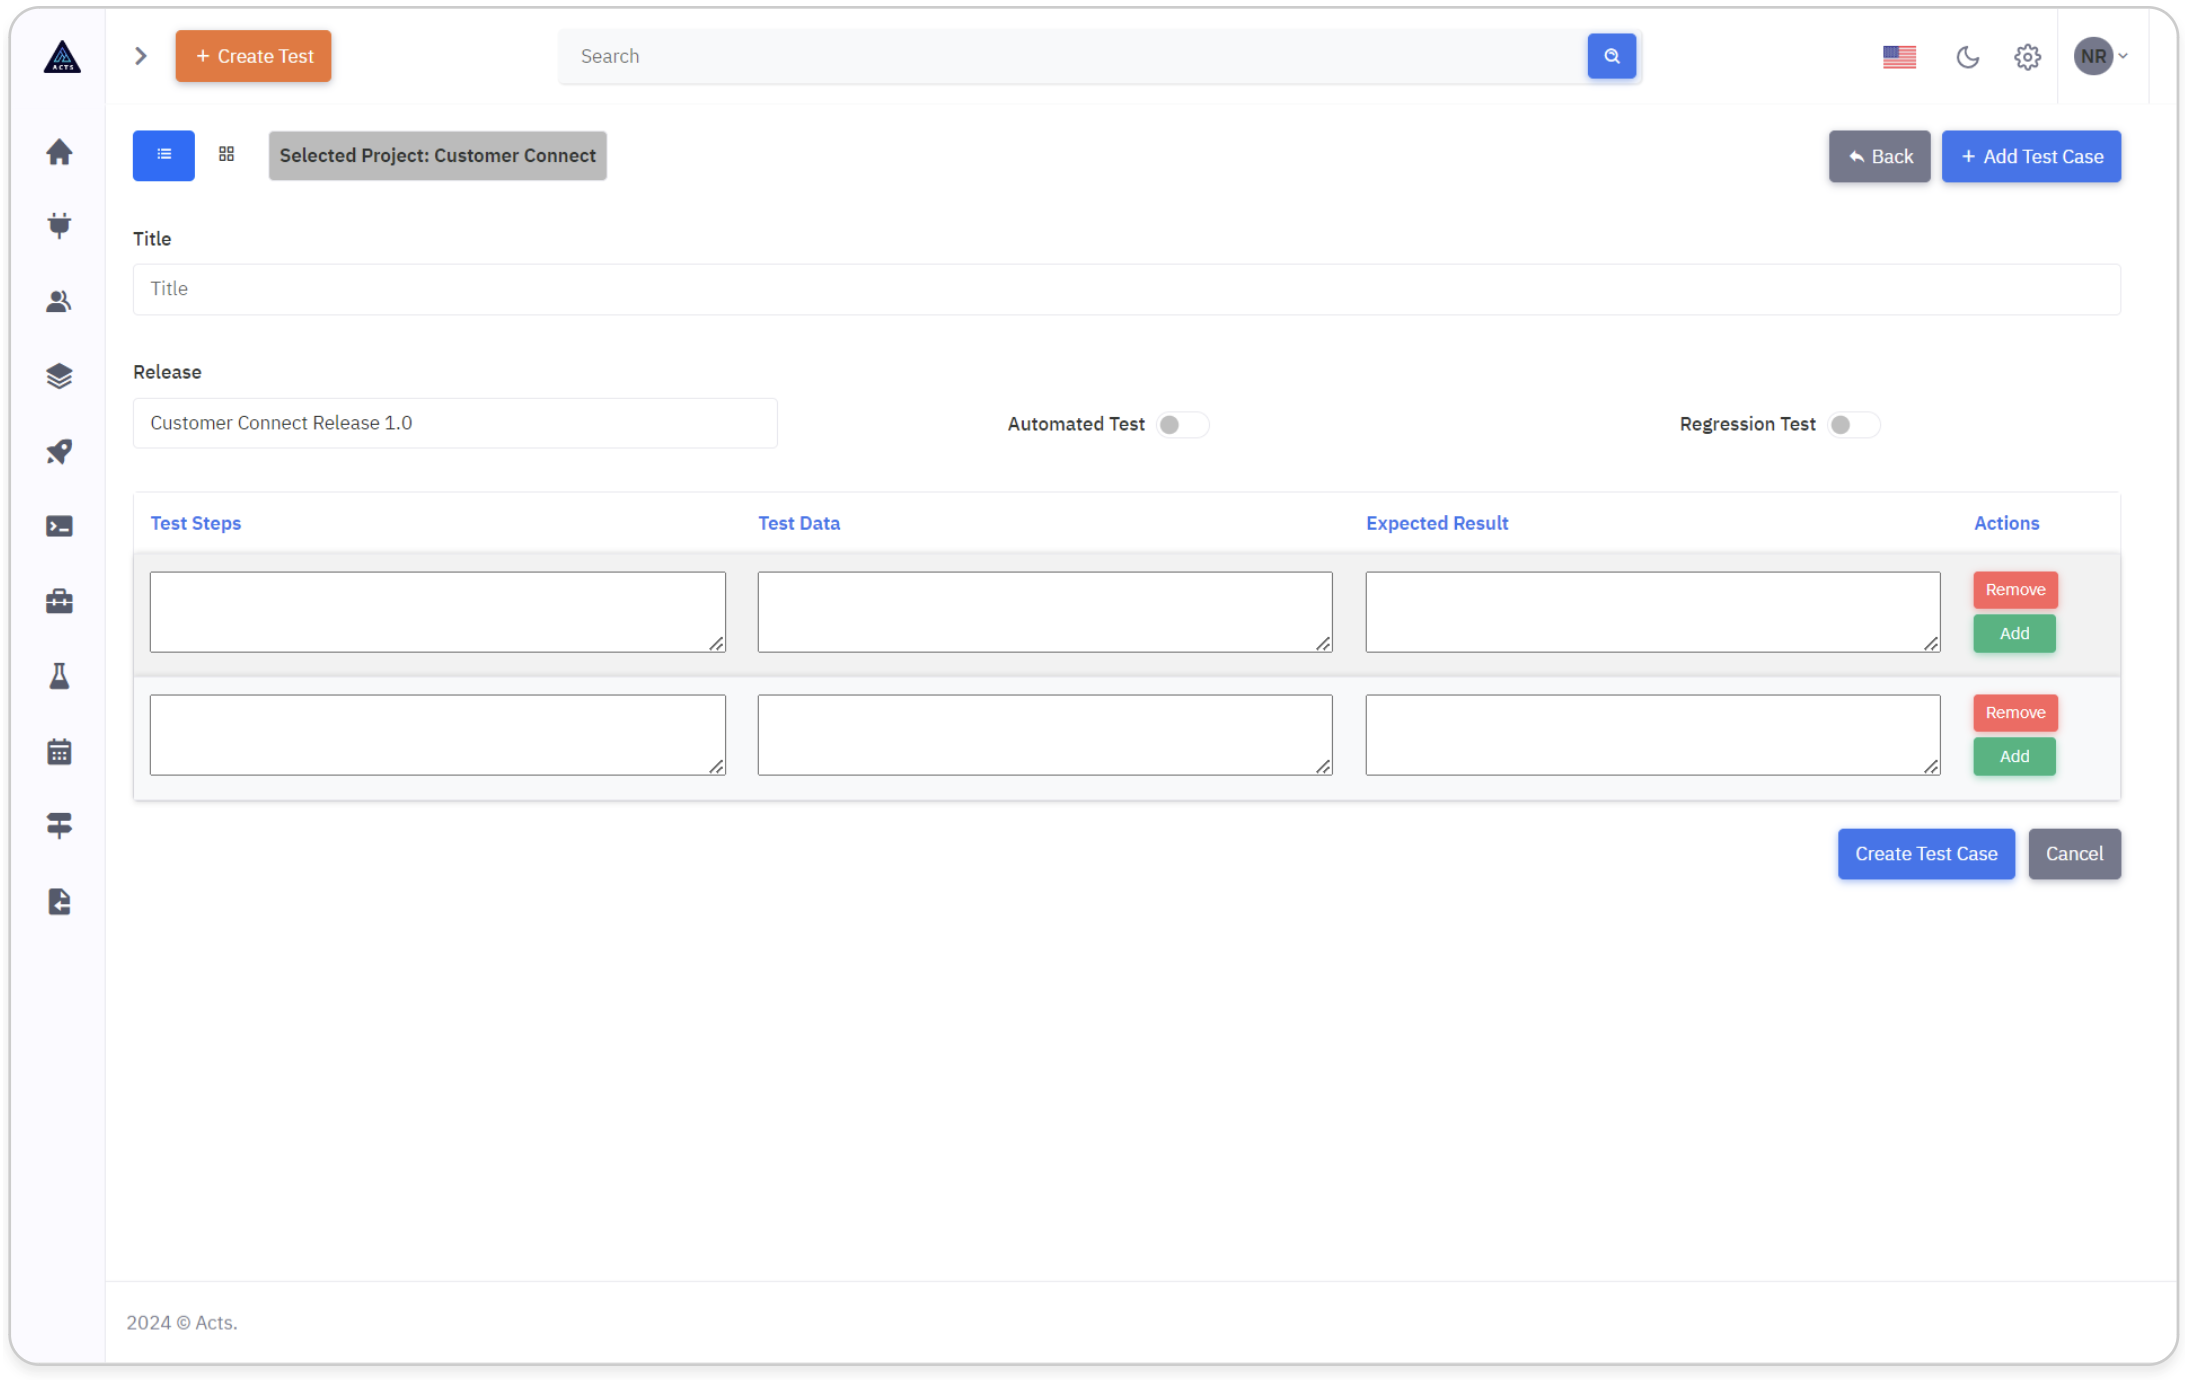
If you need to enter more steps for the same test case click the "Add" button under the Actions column.

If you need to remove the already entered steps, click the "Remove" button under the Actions column.
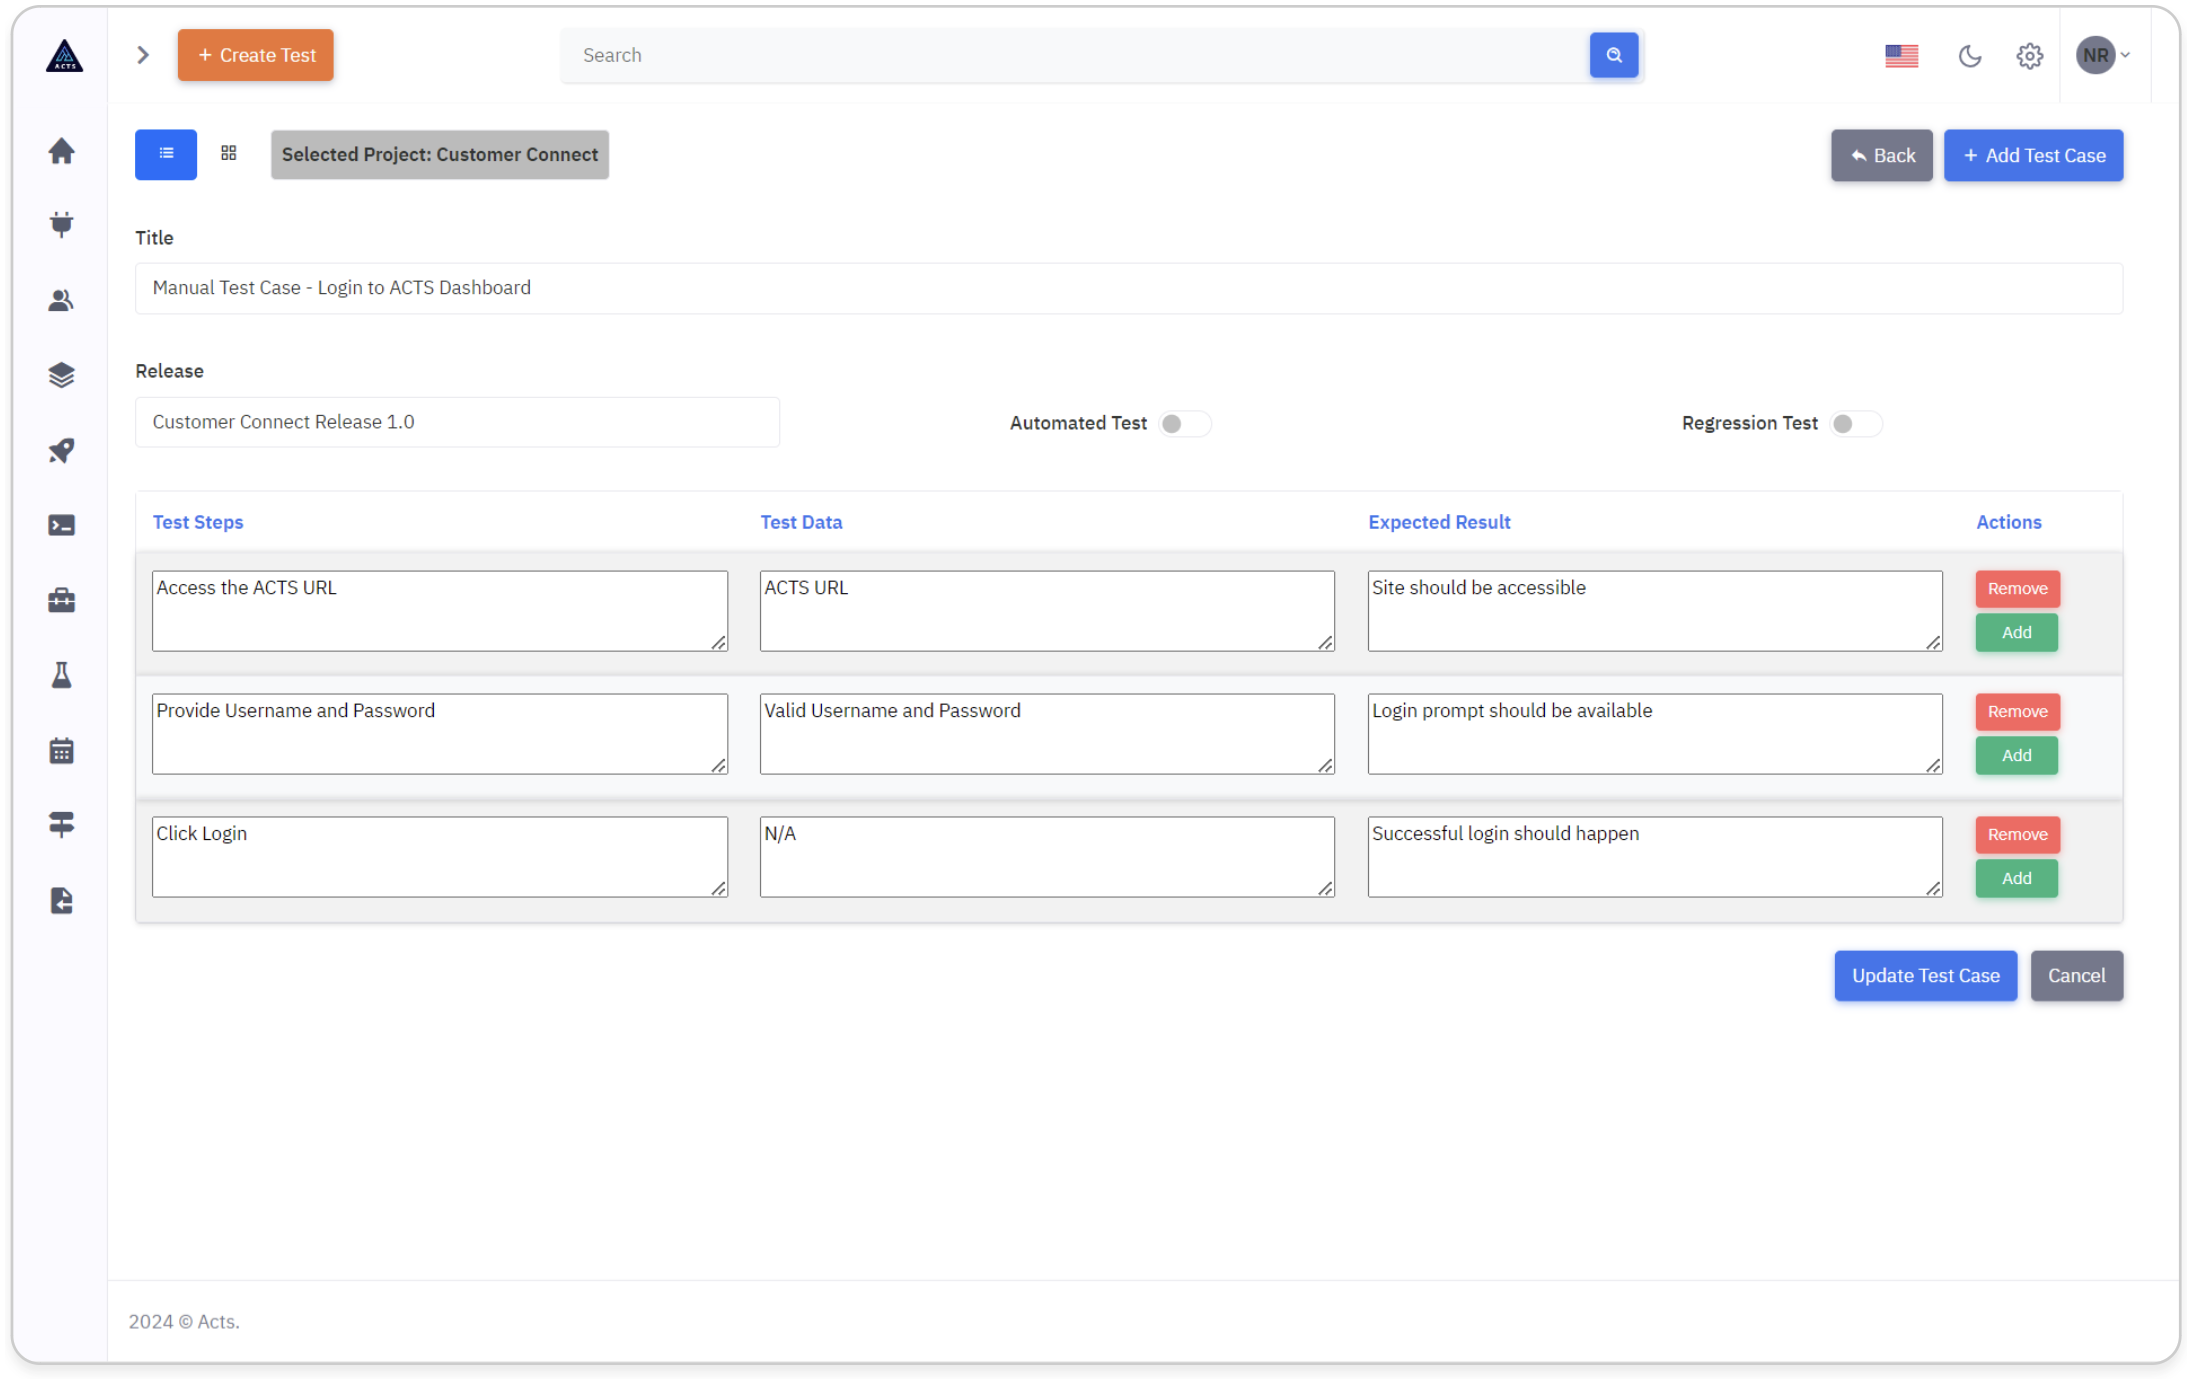
Create Test Case
Once you are done with adding the test steps, click the "Create Test Case" button to create the manual test case.
Update Manual Test Case
When editing a Manual Test Case, a modal will appear with all fields pre-filled.
User can do the edits.
Clicking on the "Update Test Case" button will update the Manual Test Case.
BI Test Case
BI automated test cases are the ones that can interact with BI systems programmatically. They may involve simulating data inputs, executing queries, comparing output results against expected outcomes.
How to create a BI Test Case
Test Case Title
Provide a title for the Test Case, facilitating easy identification and management within the application.
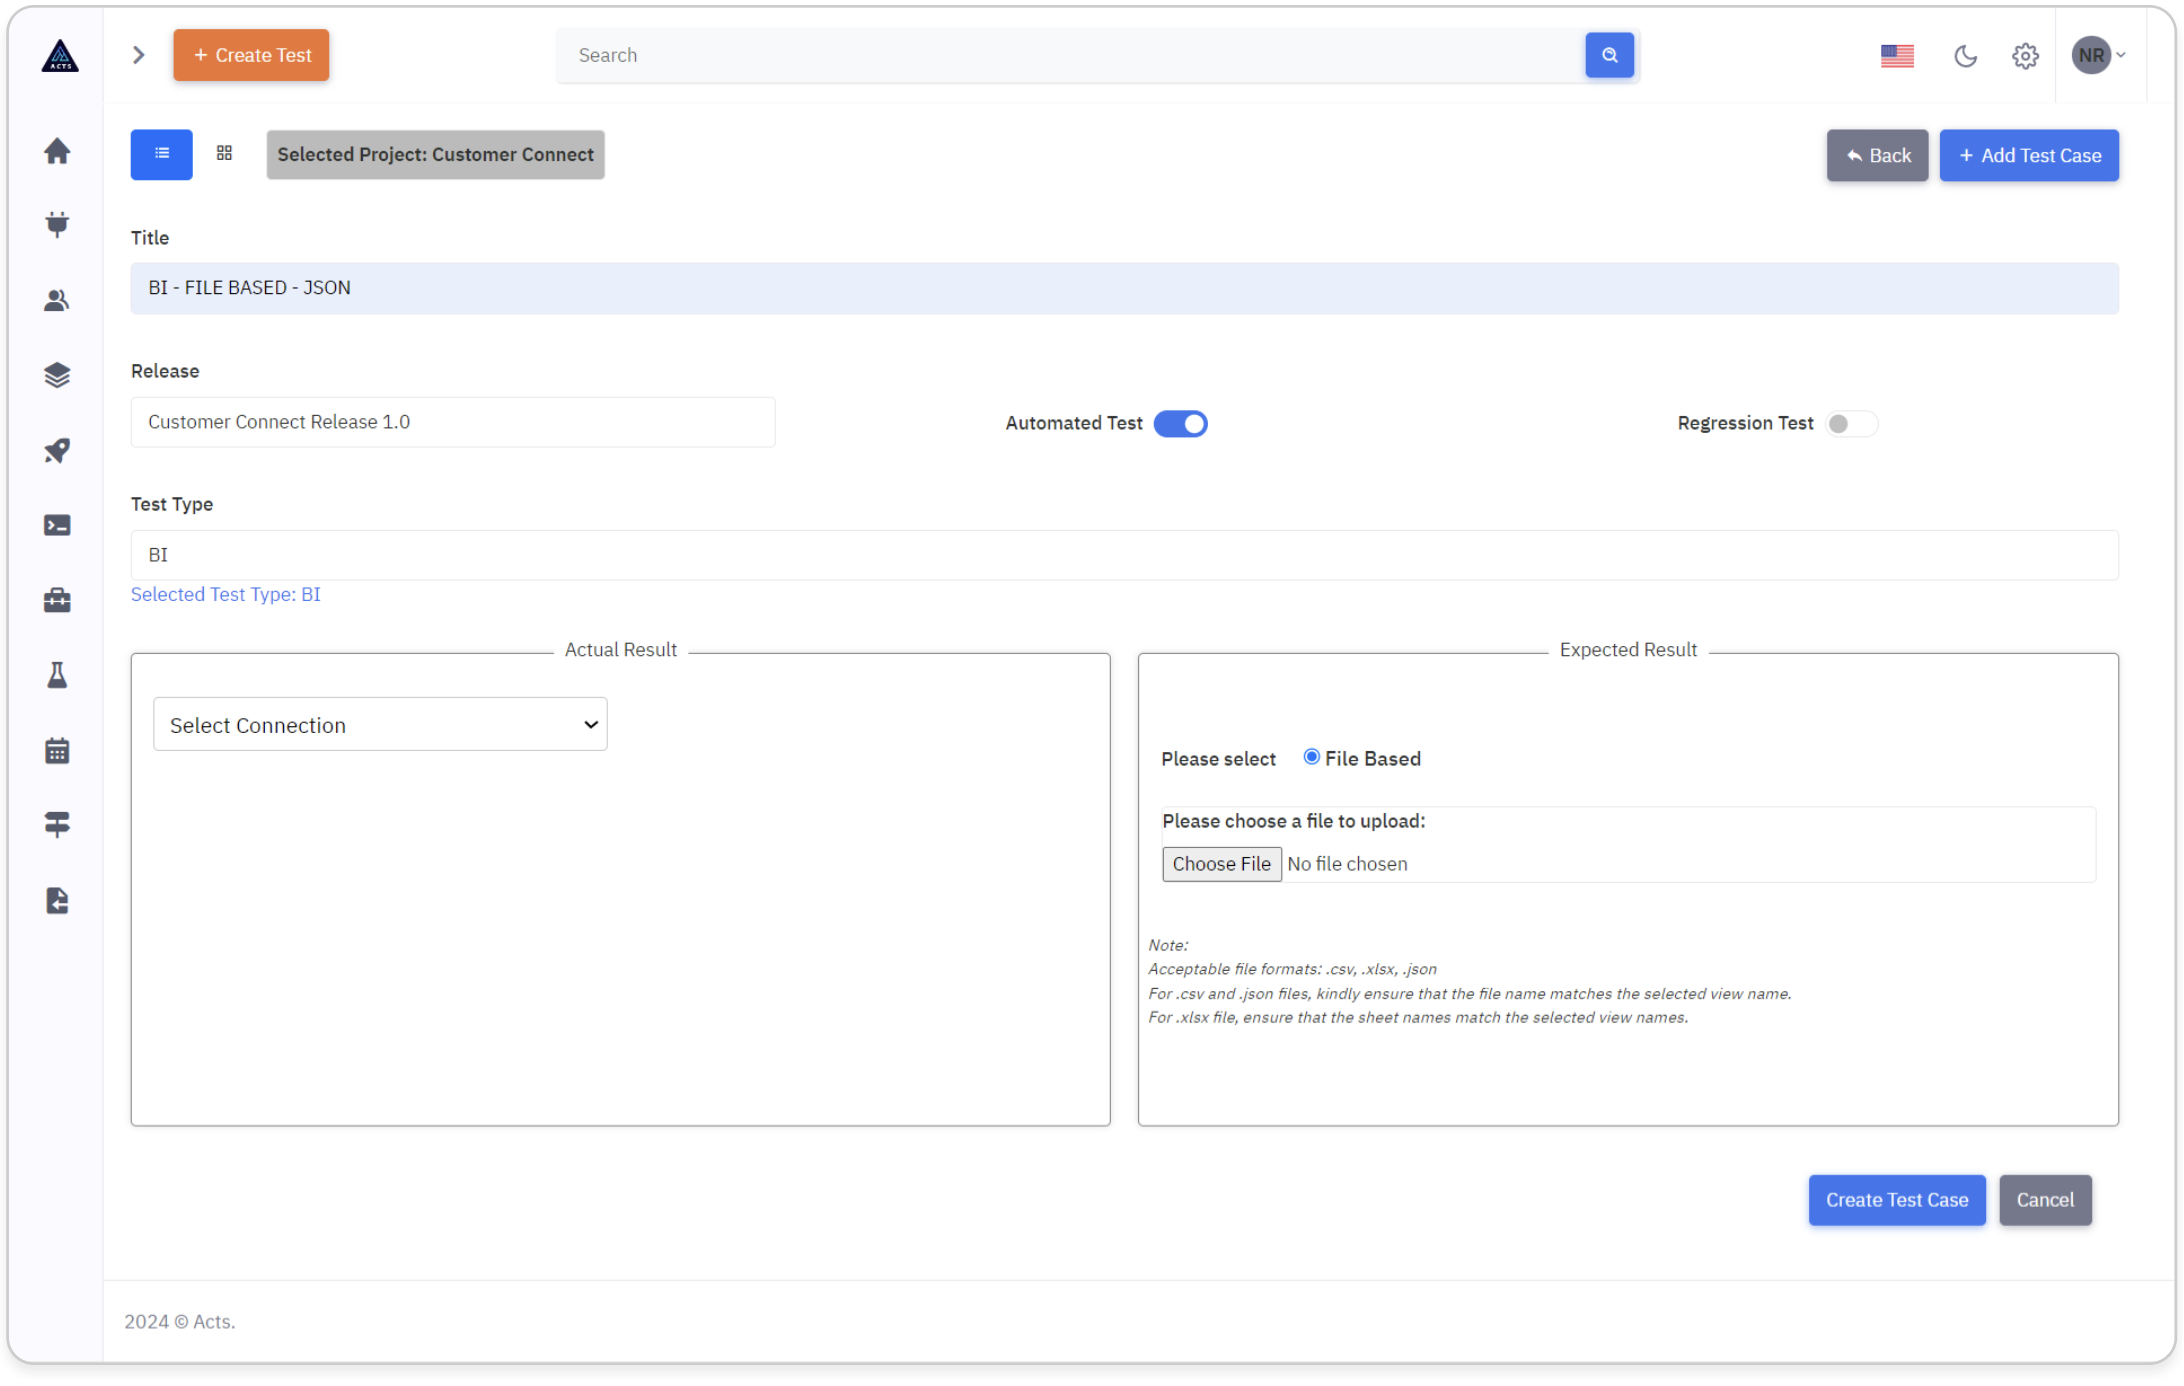
Push the Automated test button to "ON".
Once the Automated test button is "ON", users will see a "Test Type" dropdown menu listing the options below:
- API
- BI
- UI
Select the option "BI".
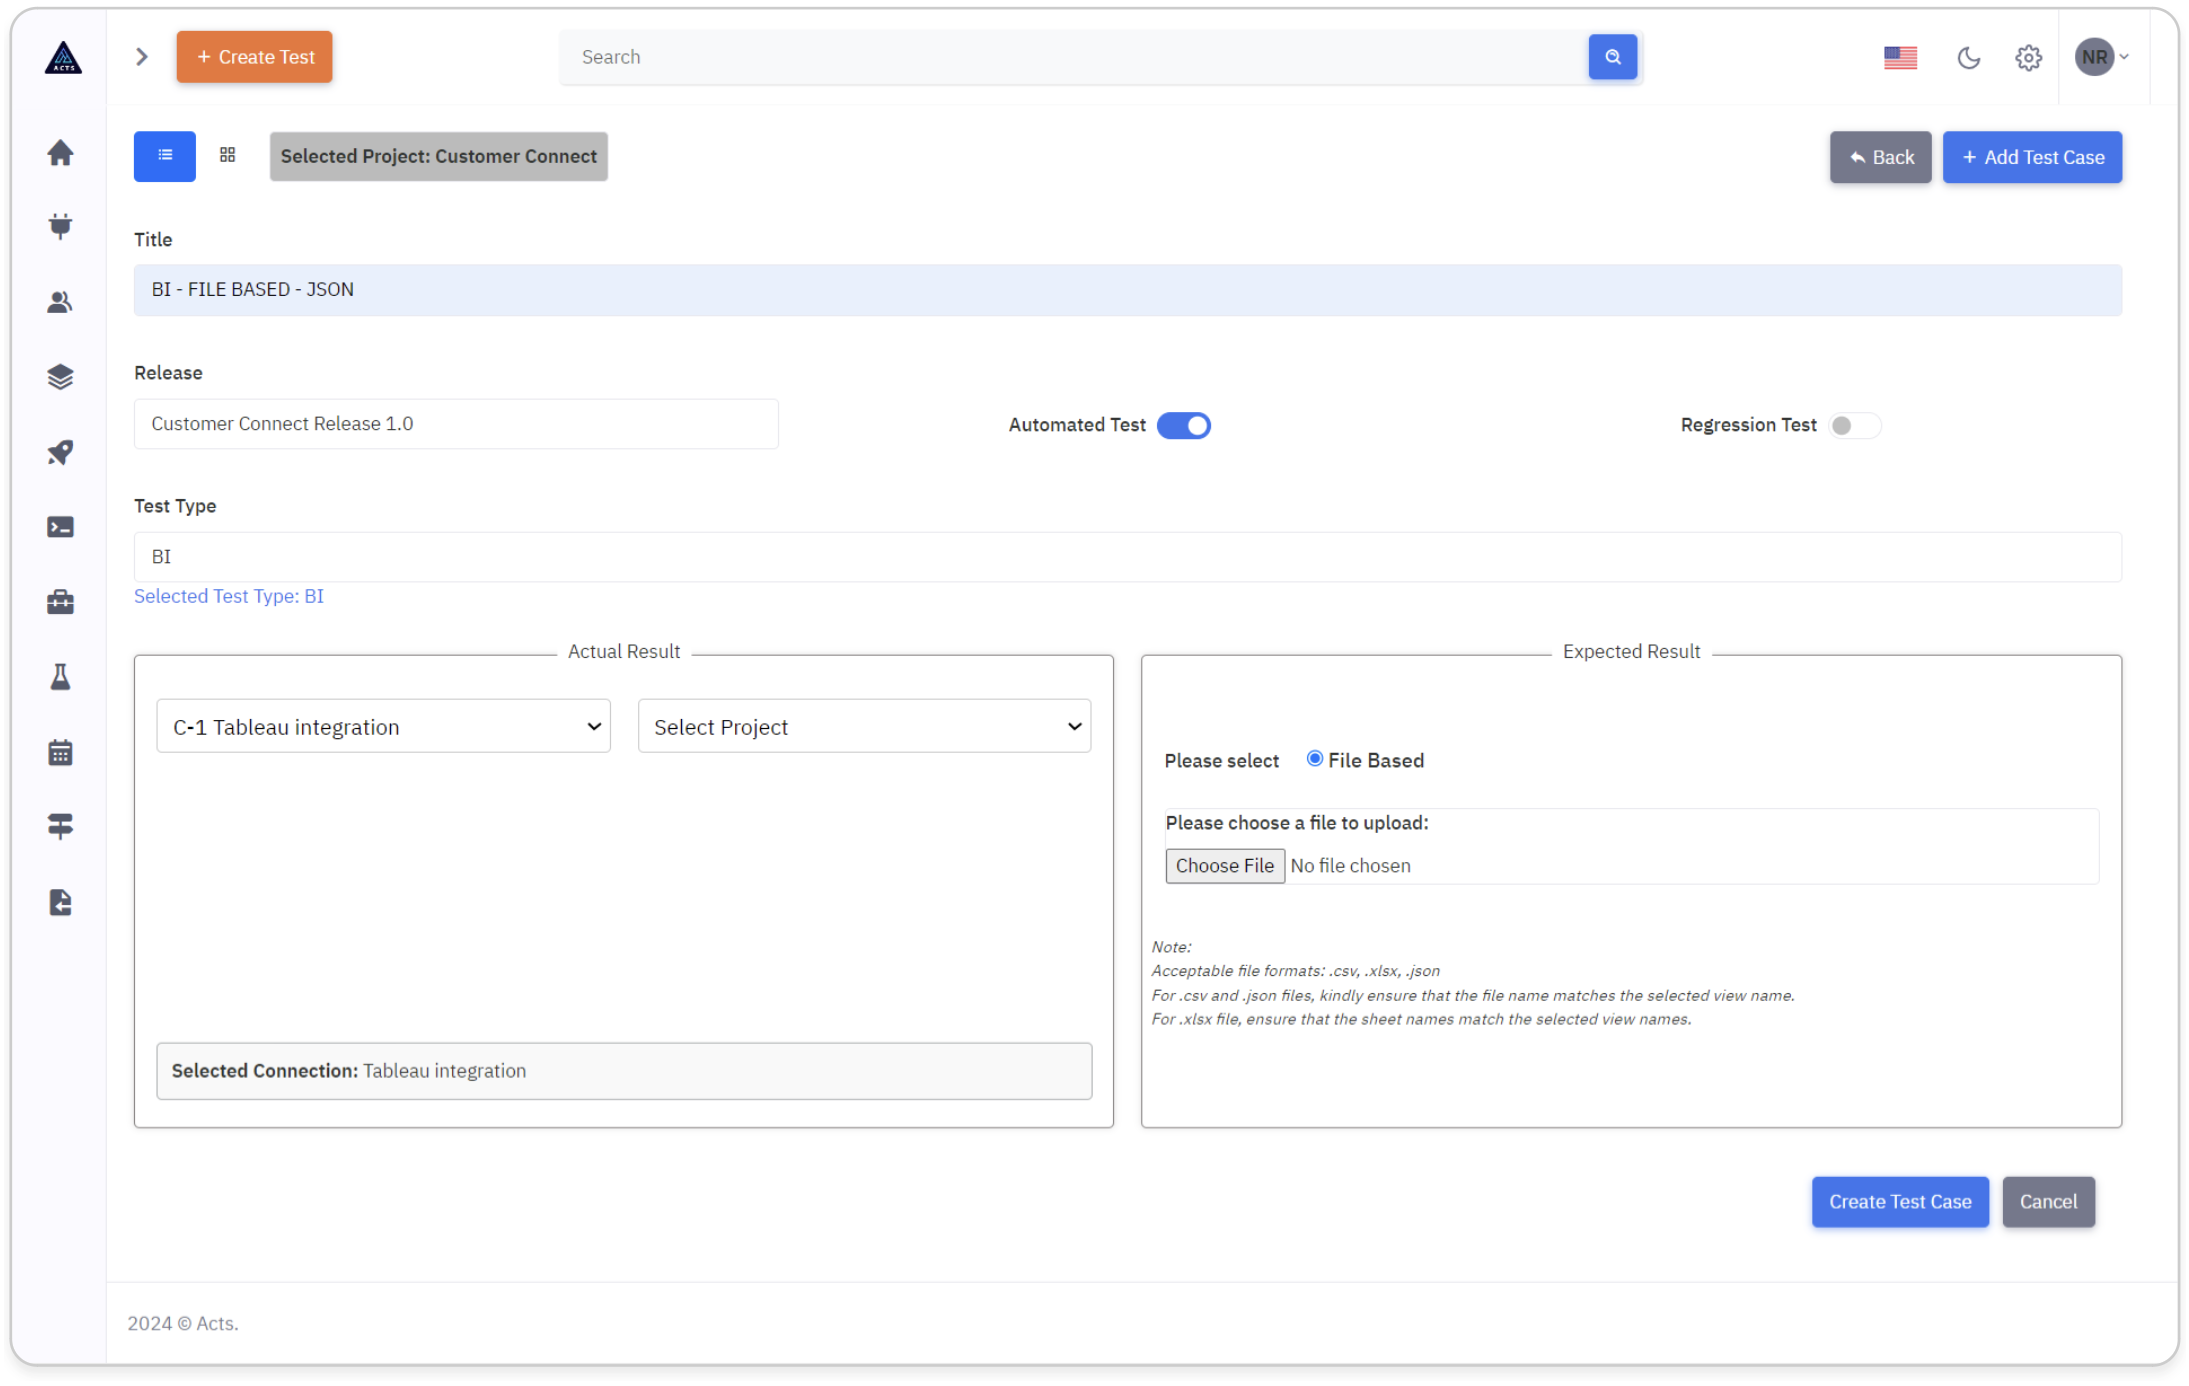
Once "BI" is selected, a new template asking to provide the Actual result and Expected result entries would be displayed.
In the Actual result window, select the Connection(Eg:Tableau) in "Select Connection" drop down.
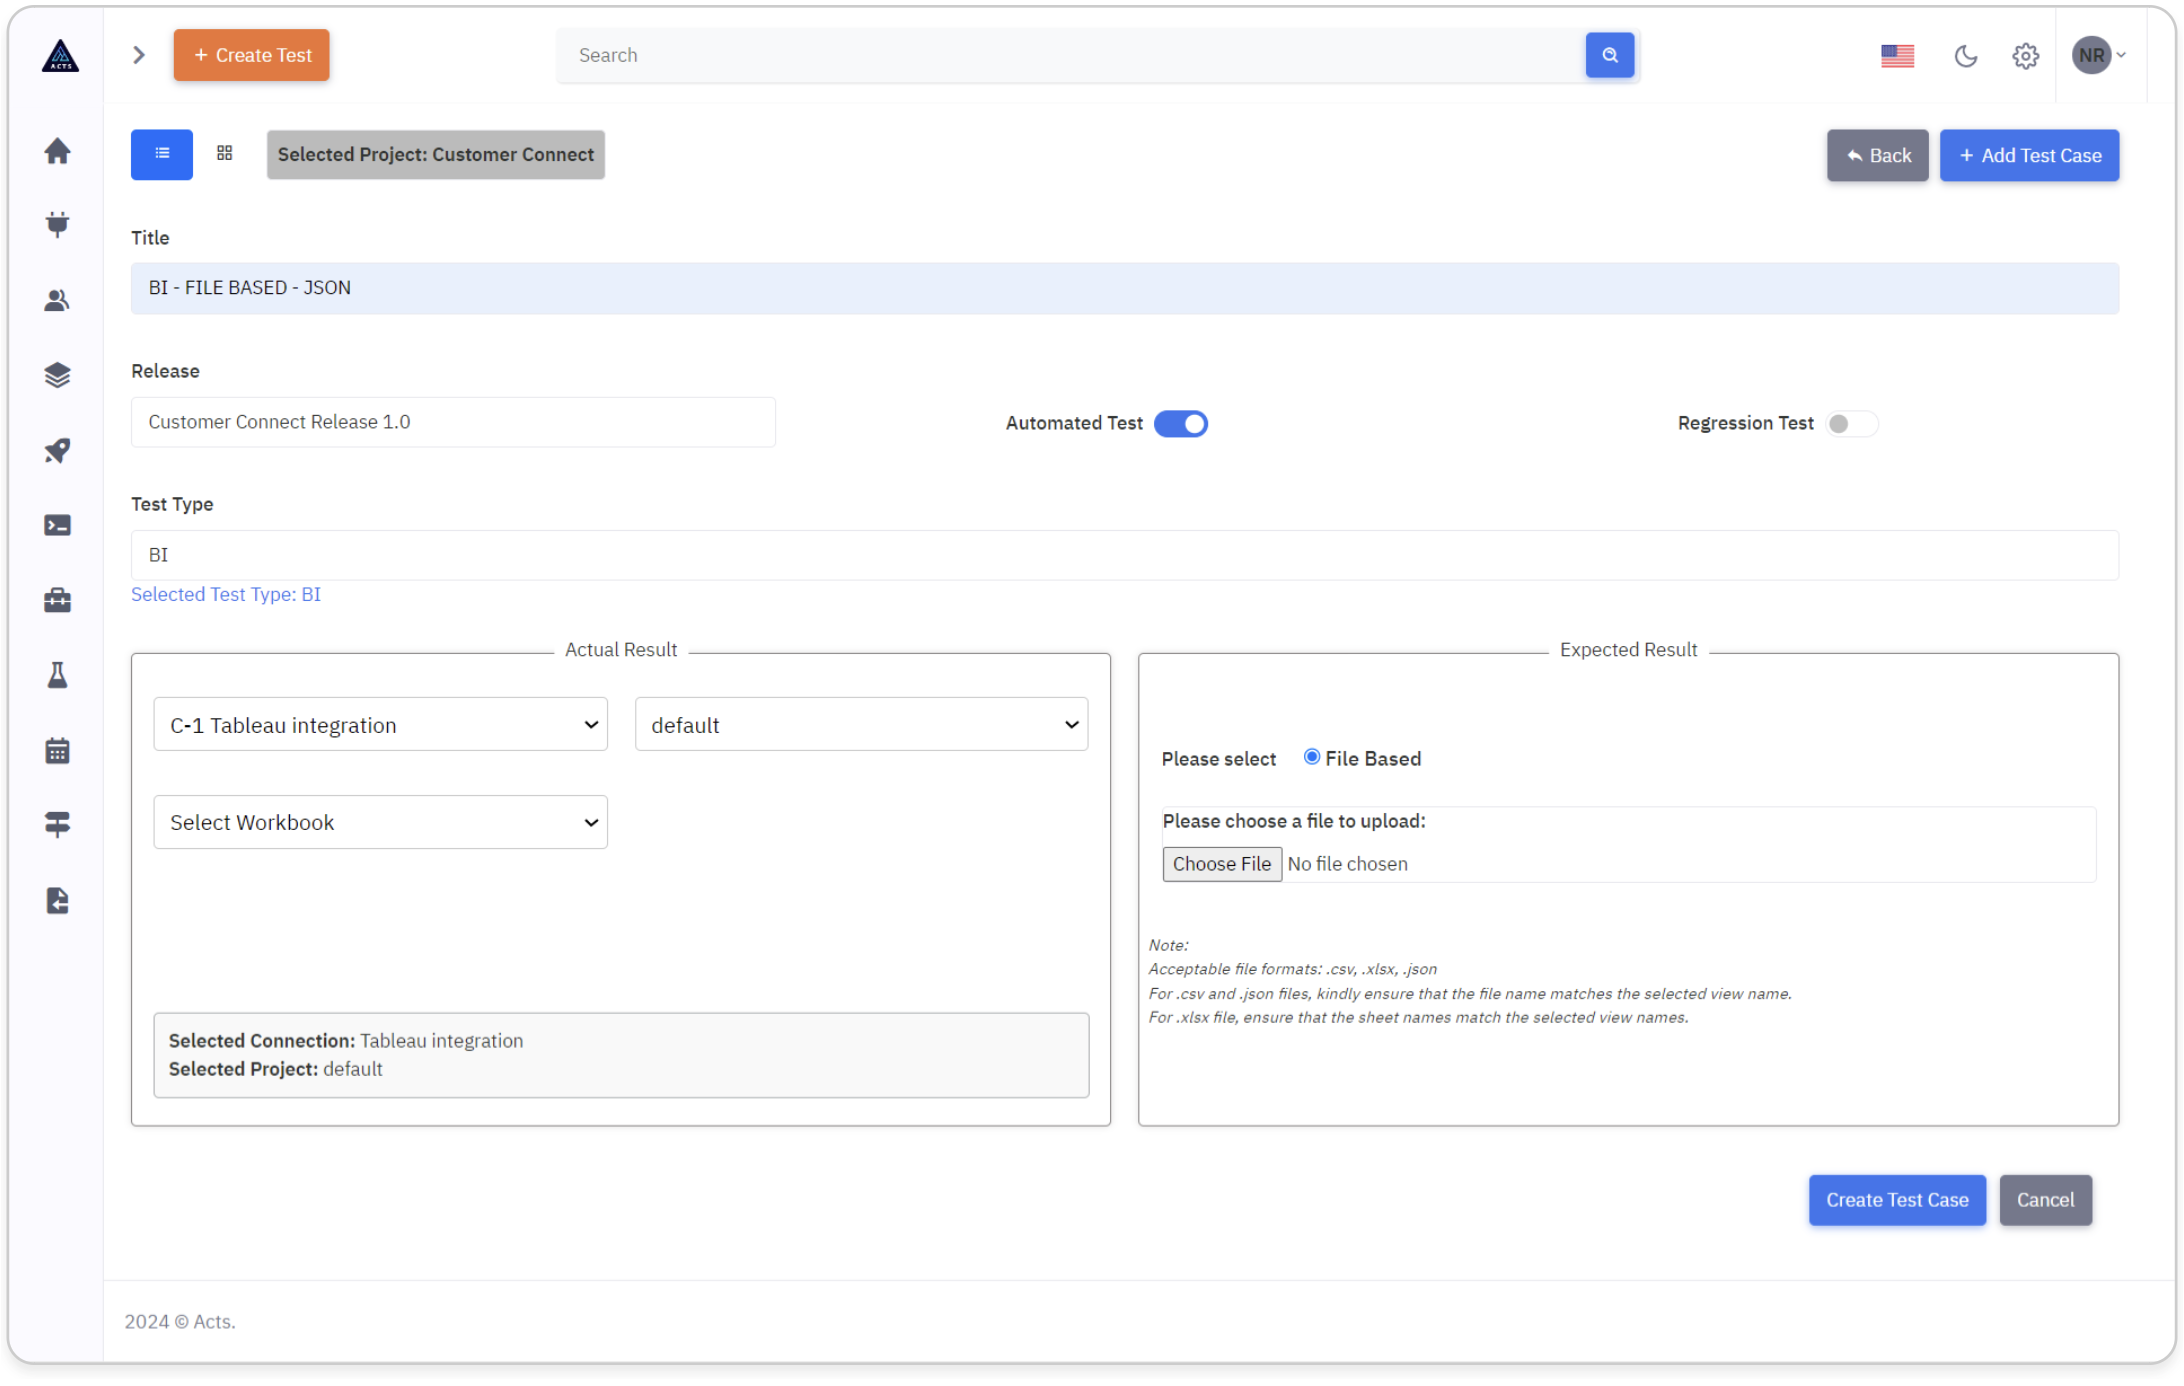
Once the connection is selected(Tableau here), a "Select Project" drop down would be displayed with list of projects available in the tableau connection. Select a project.
Once the project is selected, a "Select Workbook" drop down would be displayed with list of work books available in the selected project. Select a work book.
Once the workbook is selected, a "Select View" drop down would be displayed with the list of views available in the selected workbook. Select a view.
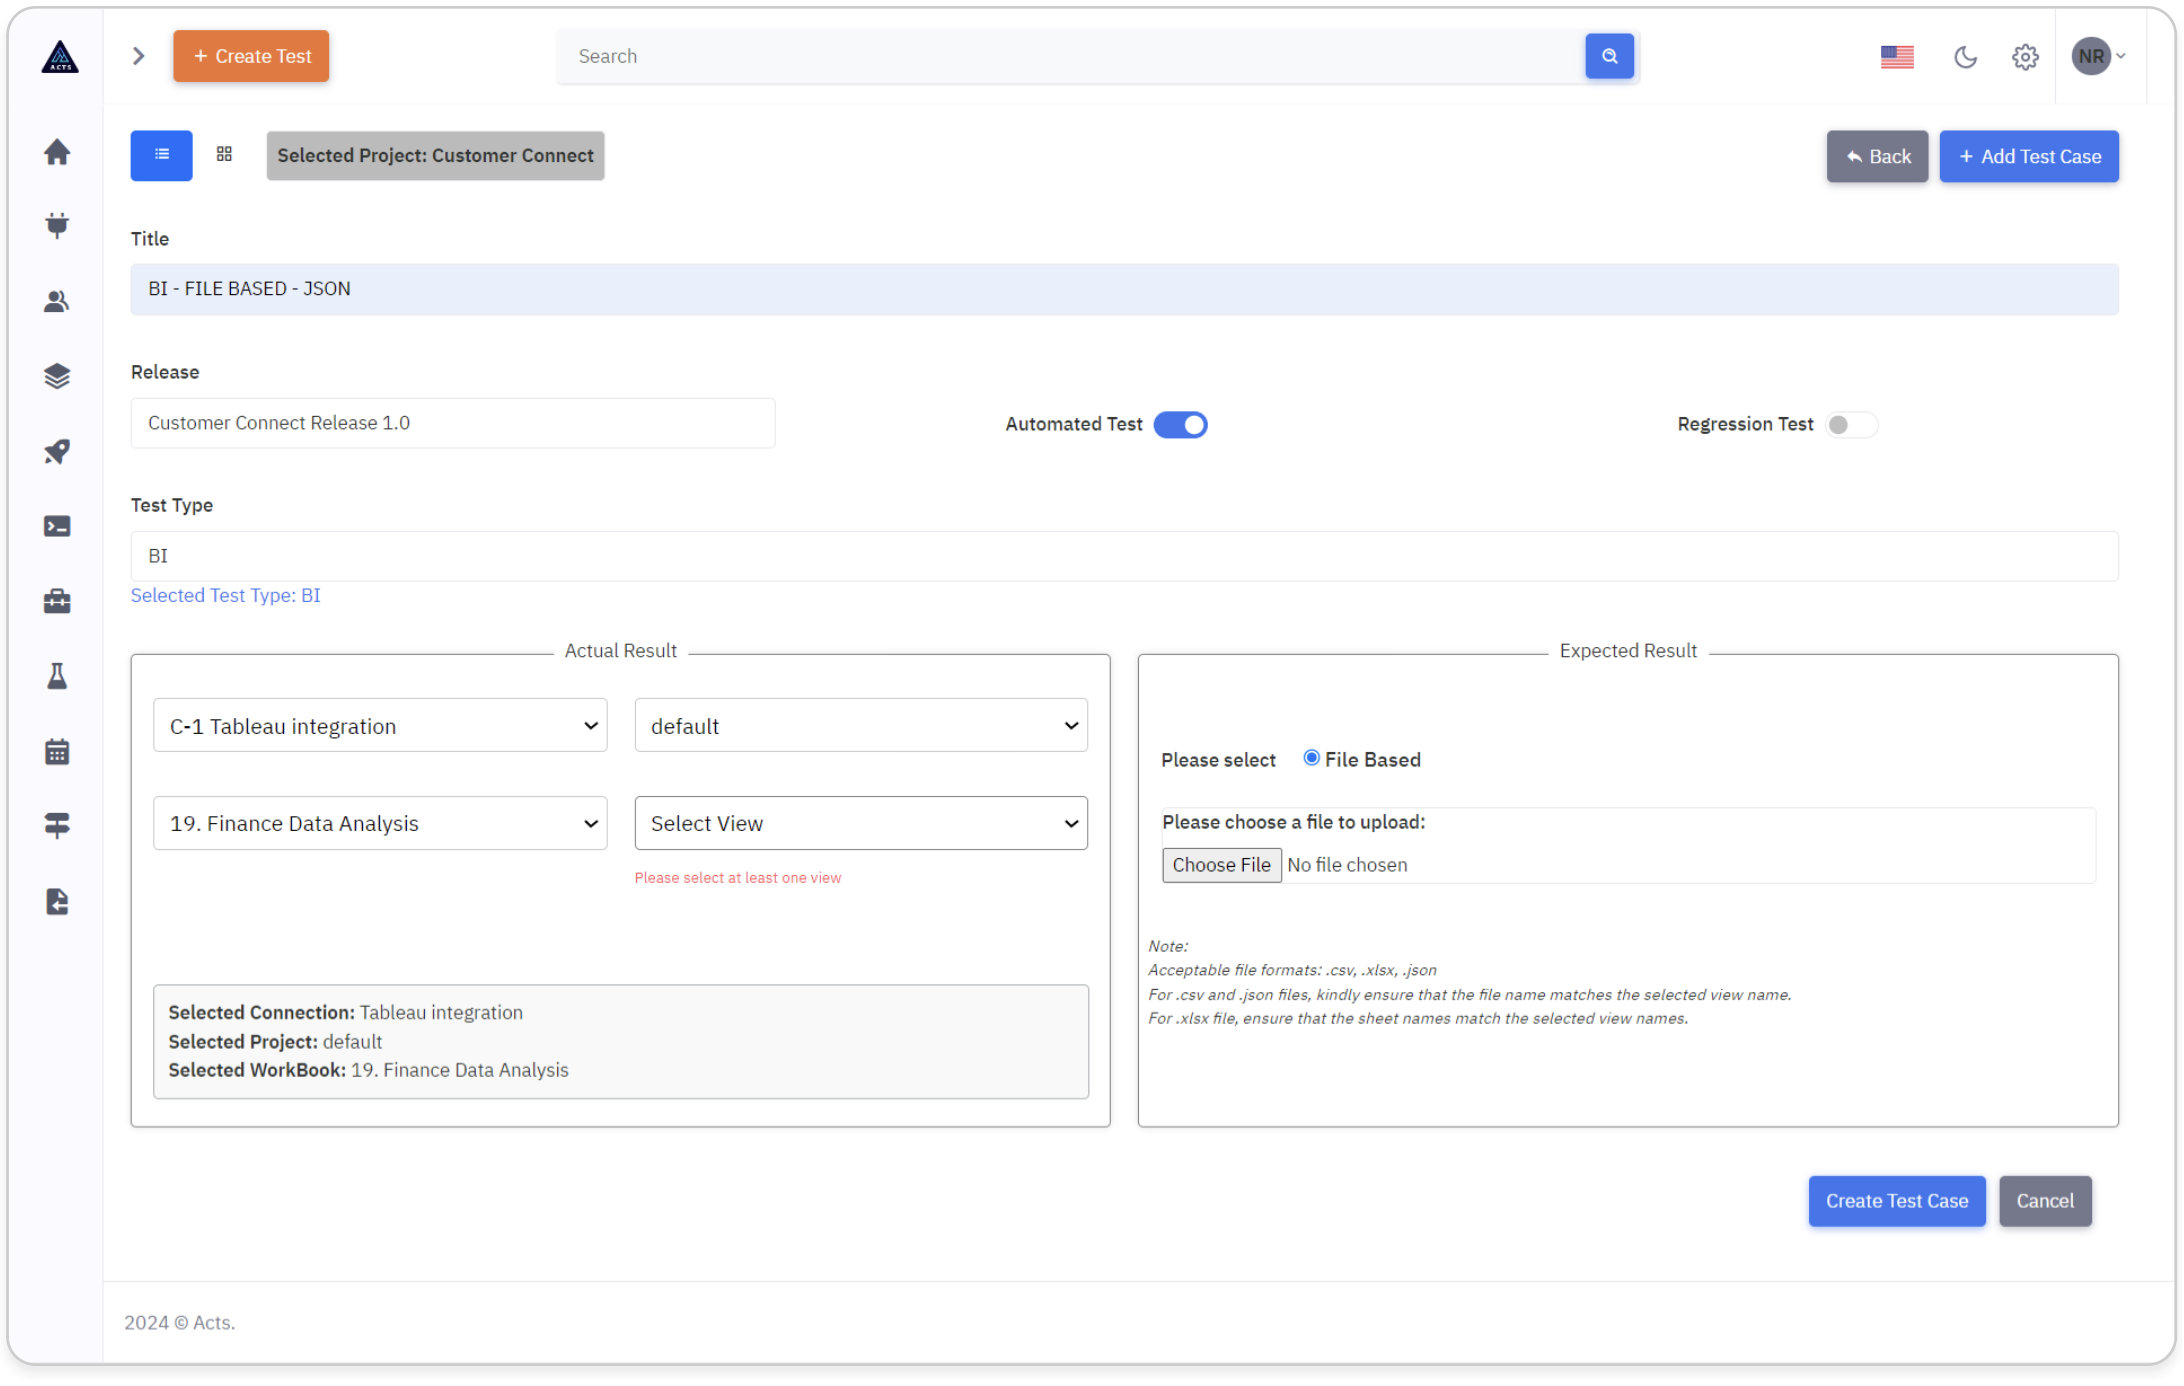
In the "Expected Result" window, choose and upload a file that you want to compare against the data selected in the "Actual Result" window above.
Create BI Test Case
Finally, click the "Create Test Case" button to create the BI test case.
Update BI Test Case
When editing a BI Test Case, a modal will appear with all fields pre-filled.
For security purposes, the view of the workbook will be reset and the file uploaded in Expected Result Window will be removed, requiring users to re-enter this information.
This ensures that sensitive information is not exposed unnecessarily and enhances security measures within the application.
Clicking on the "Update Test Case" button will update the BI Test Case.

API Test Case
API automated test cases are the ones that can programmatically interact with APIs. They involve sending requests to API endpoints, providing input data, validating response data, and checking for expected behaviors. This includes testing different HTTP methods (such as GET, POST, PUT, DELETE), request parameters, headers, and response status codes.
How to create an API Test Case
Test Case Title
Provide a title for the Test Case, facilitating easy identification and management within the application.
Push the Automated test button to "ON".
Once the Automated test button is "ON", users will see a "Test Type" dropdown menu listing the options below:
- API
- BI
- UI
Select the option "API".
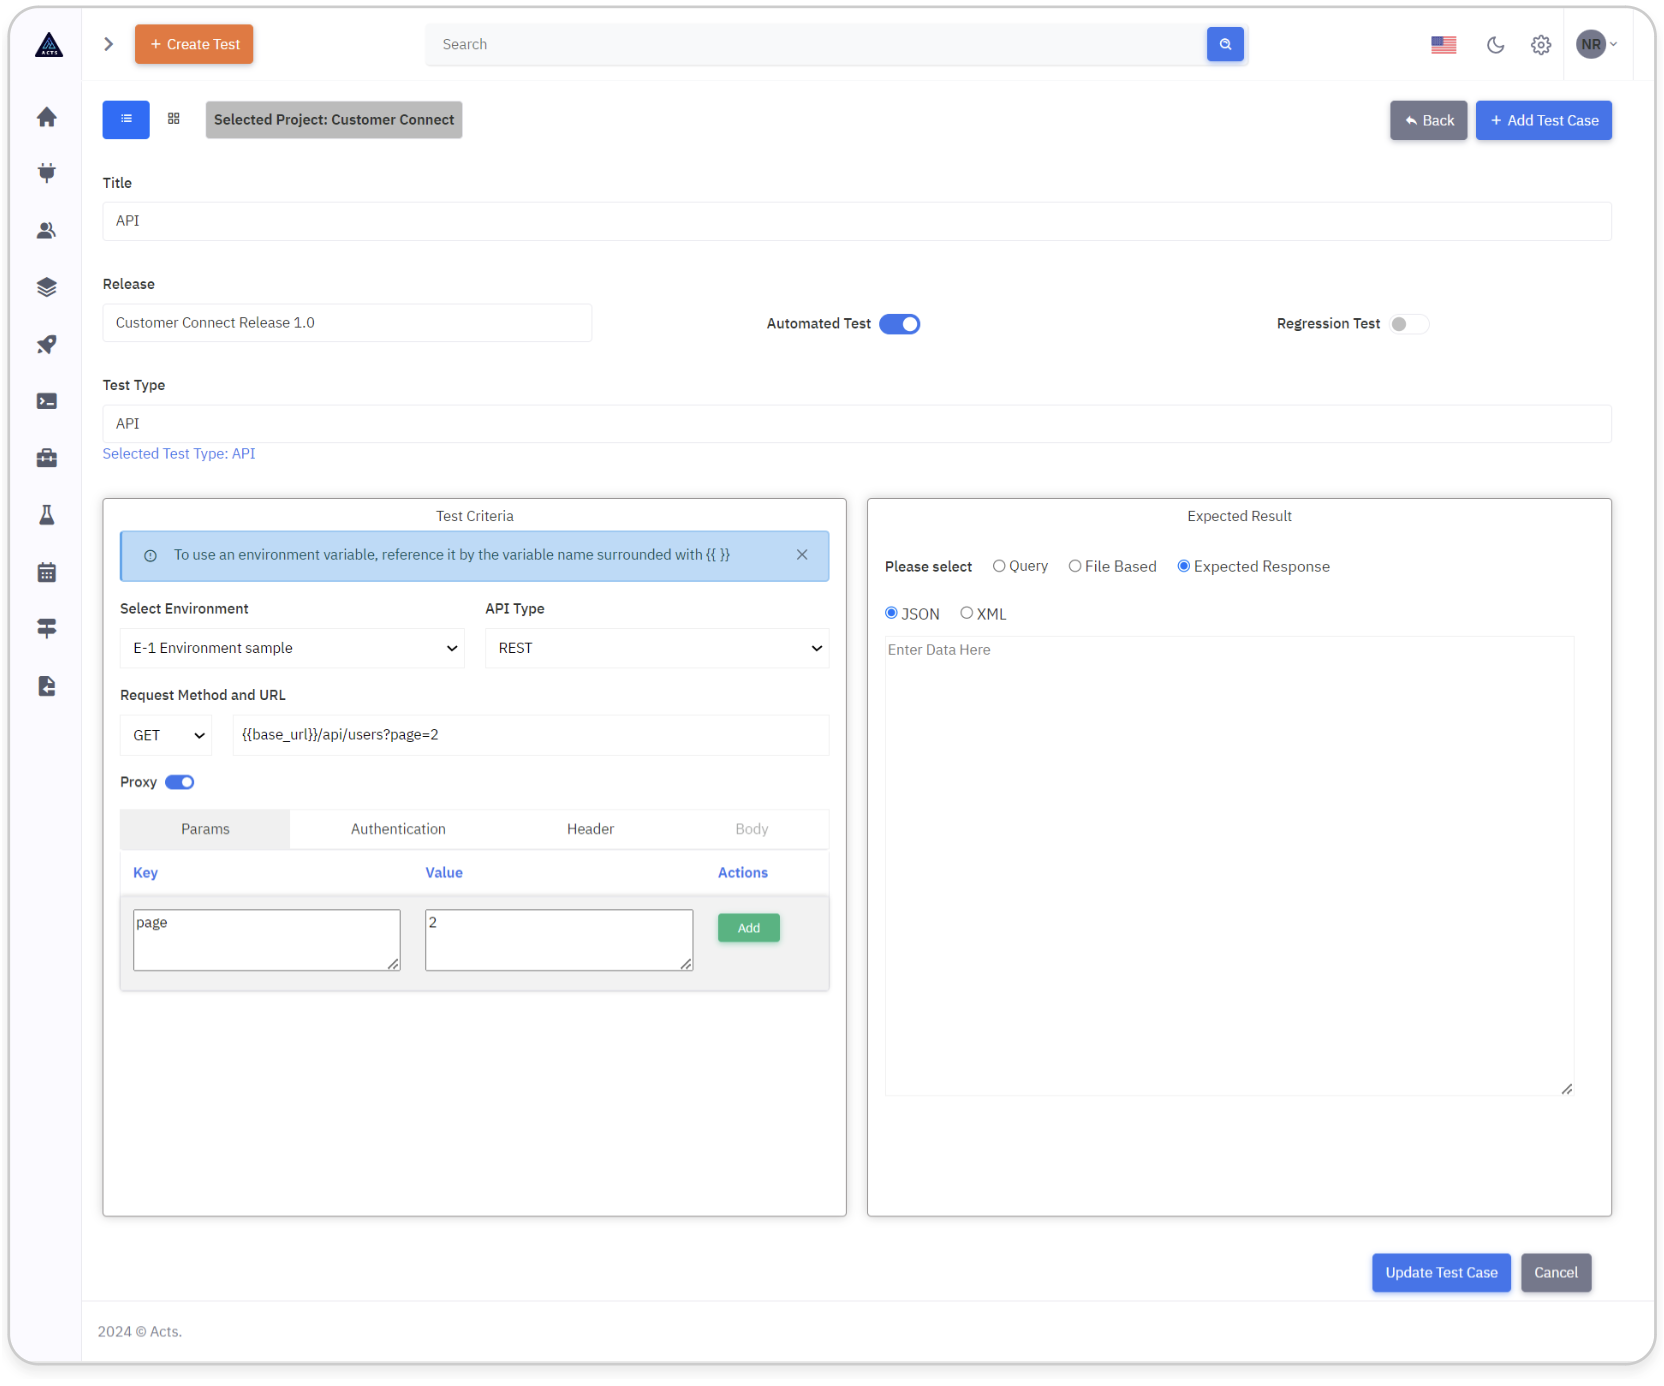
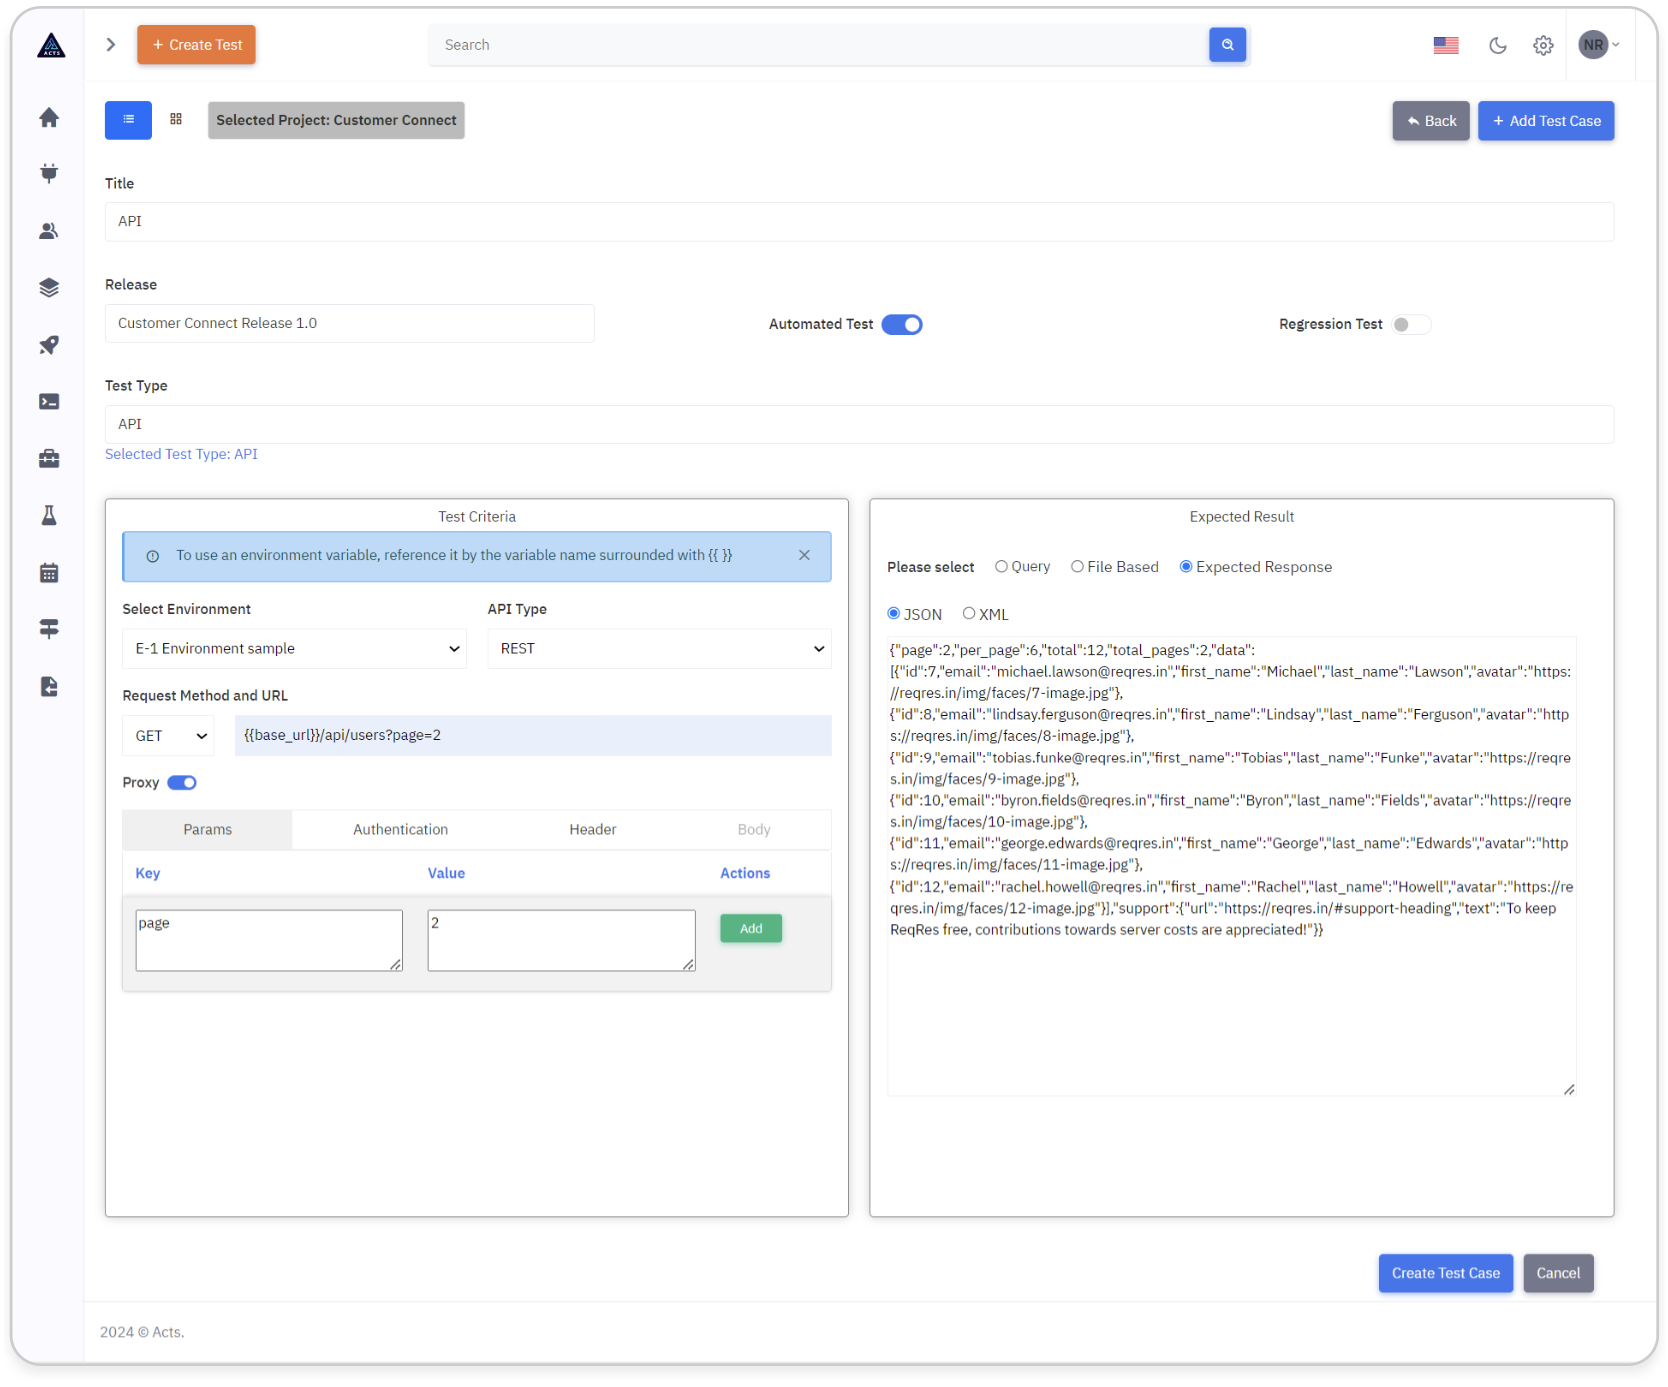
Once "API" is selected, a new template asking to provide the Test Criteria and Expected result entries would be displayed.
In the Test Criteria window, provide the following:
Select the Environment in "Select Environment" drop down. If you don't need any environment to be selected, then leave the default selection "No Environment". In this example, we are selecting "E-1 Customer Demo" which has a key pair value "Host" and "https://reqres.in" predefined.
Select the API Type as "REST".
Select the Request Method as "GET".
Since we have selected the Environment already, in the URL field type the URL from where the data has to be extracted like this Host/reqres.in/api/users?page=2.
In the Expected Result window, select Expected Response and enter the response data in JSON format.This data will be compared with the data that is extracted based on the details provided in the Criteria Window.
Create an API Test Case
Finally, click the "Create Test Case" button to create the API test case.
Update an API Test Case
When editing a API Test Case, a modal will appear with all fields pre-filled.
For security purposes, the expected response data will be removed, requiring users to re-enter this information.
This ensures that sensitive information is not exposed unnecessarily and enhances security measures within the application.
Clicking on the "Update Test Case" button will update the API Test Case.